Nail Prep for Gel Services – Step-by-Step Beginner’s Guide
Quick Answer: What Are the Steps for Nail Prep?
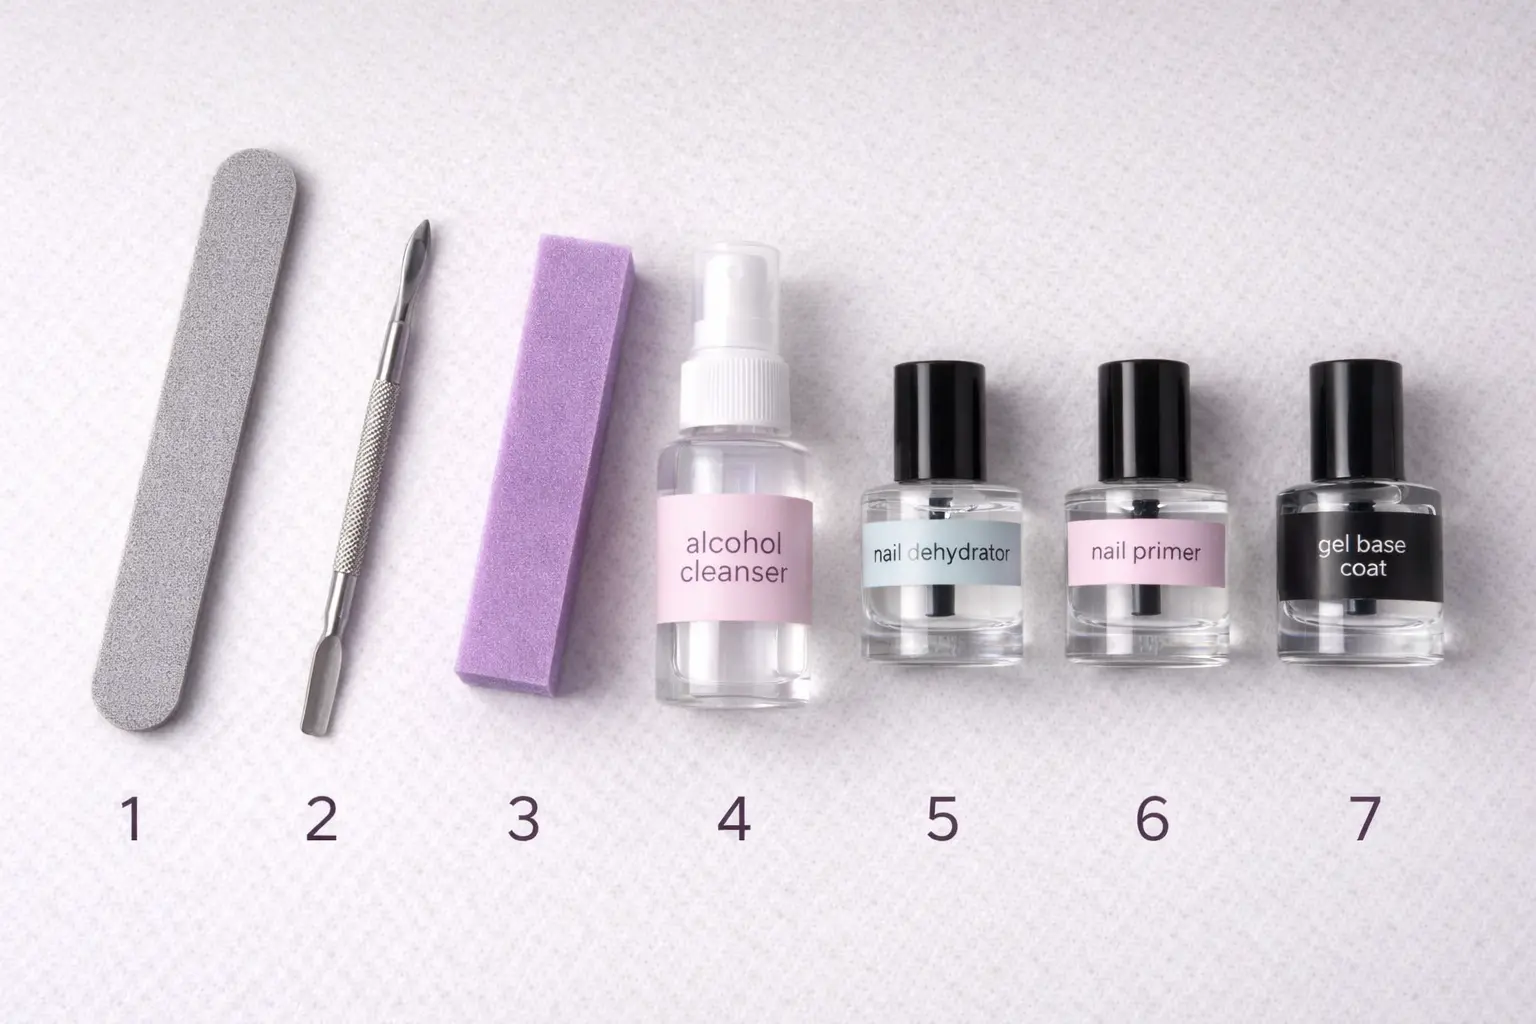
The complete nail prep sequence is: file and shape, push back cuticles, remove cuticle from the nail plate, buff the nail surface, clean with alcohol, apply dehydrator, apply primer, then apply base coat. Each step must be performed in this order with correct timing to prevent lifting.
The Nail Prep Course demonstrates each step with close-up video showing hand positioning, product application, and timing protocols that eliminate guesswork for beginner technicians.
Why Beginners Struggle With Gel Prep
Beginner nail technicians learning gel application experience lifting within three to seven days because they do not understand the purpose of each prep step or the timing required between products. Gel brands provide minimal prep instruction, typically listing product names without explaining technique, sequence, or timing. This leaves new technicians guessing which steps are essential and which can be skipped or reordered.
The confusion is compounded by conflicting advice from online tutorials, product marketing that oversimplifies the prep process, and experienced technicians who perform prep steps rapidly from muscle memory without verbalising the technique details that beginners need. Without structured instruction, new technicians develop inconsistent habits that produce unreliable results.
Proper nail prep is not intuitive. Each step serves a specific function, and skipping or reordering steps creates adhesion failures that are difficult to diagnose without understanding the underlying chemistry. This guide provides the complete prep sequence with explanations of why each step matters and what happens when it is performed incorrectly.
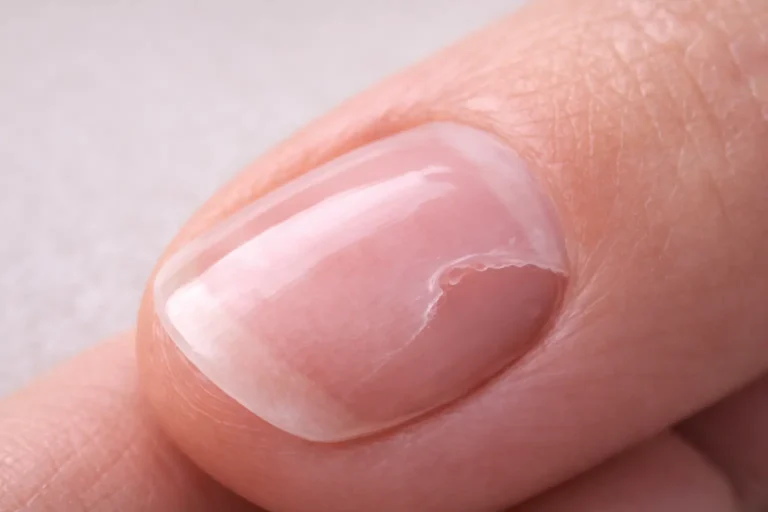
Step 1: File and Shape the Natural Nail
Filing creates the nail length and edge shape the client has requested. File from sidewall to centre in smooth, directional strokes using a 180-grit file or finer. Filing back and forth creates heat and micro-tears at the free edge that can develop into splits during wear. Always file in one direction per stroke.
The free edge should be smooth with no rough patches or uneven areas. Run your finger along the edge from underneath—any catches or sharp points indicate areas that need additional filing. A smooth free edge prevents snagging and reduces stress concentration points where cracks can initiate.
Shape selection affects how the nail wears during the service life. Squoval and rounded shapes distribute stress evenly and are more resistant to breakage than sharp corners or extreme stiletto points. Beginners should recommend conservative shapes until they have mastered the structural techniques required for maintaining dramatic shapes.
Step 2: Push Back and Remove Cuticle
The eponychium (the living skin fold at the base of the nail) must be gently pushed back to expose the true cuticle adhered to the nail plate. Use a cuticle pusher or orangewood stick with gentle pressure, working from sidewall to sidewall in smooth motions. The eponychium should move back easily without blanching or discomfort.
The true cuticle is the thin, translucent layer of dead tissue adhered to the nail plate surface. This layer must be removed because it prevents base coat from contacting the nail plate directly. Use a cuticle remover gel or cream to soften the cuticle, then gently scrape it away with the cuticle pusher or a specialised cuticle bit if working with an e-file.
Cuticle removal is a critical prep step that beginners often skip or perform inadequately. Leaving cuticle on the nail plate creates a barrier layer between the natural nail and the gel base coat. This barrier causes lifting that begins at the cuticle area and spreads toward the free edge as the gel separates from the residual cuticle tissue.
The Russian Manicure course demonstrates advanced cuticle removal techniques using e-file bits designed specifically for this purpose. Russian Manicure provides more thorough cuticle removal than traditional methods and creates cleaner nail plate surfaces for gel application.
Step 3: Buff the Nail Plate Surface
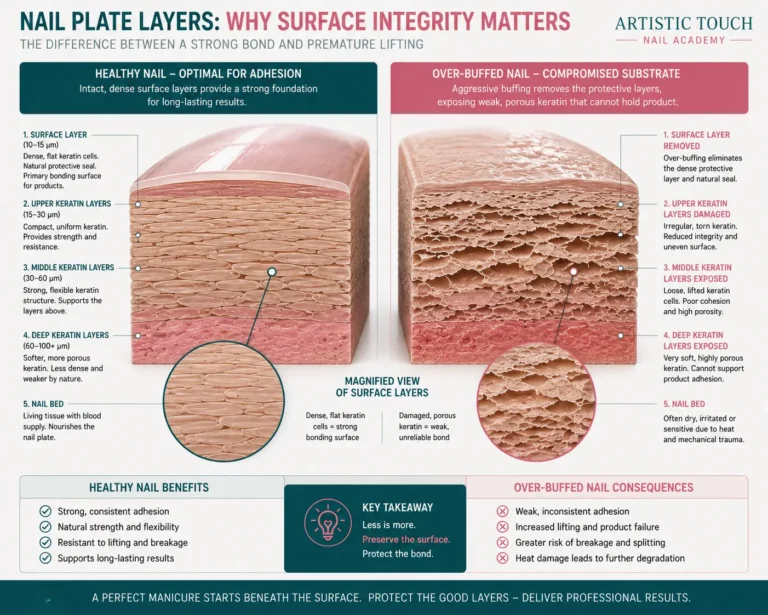
Buffing removes the natural shine from the nail plate and creates microscopic texture that improves gel adhesion. Use a 180-grit buffer or higher (higher grit numbers indicate finer buffing surfaces). Buff in gentle, sweeping motions across the entire nail plate from cuticle to free edge and sidewall to sidewall.
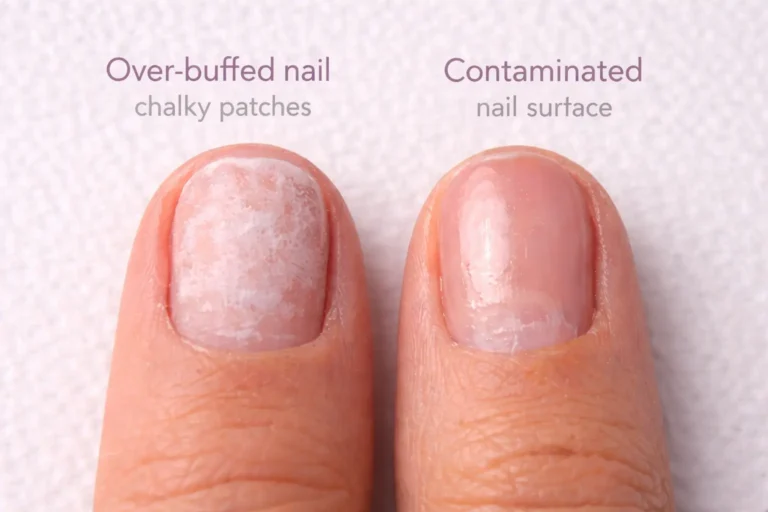
The goal is to create a matte appearance without thinning the nail or generating heat. Over-buffing removes too many keratin layers and creates a weakened nail plate that cannot support gel adhesion. Under-buffing leaves glossy patches where the natural oils have not been removed. Both errors cause lifting.
The nail plate should feel smooth to the touch after buffing but should not show visible scratches or white patches indicating excessive keratin removal. If the nail feels warm during buffing, you are applying too much pressure or buffing too long in one area. Reduce pressure and use faster, lighter strokes.
Some gel systems claim that buffing is optional when using their specific base coat formulations. Verify your gel brand’s technical specifications before skipping the buffing step. Most traditional gel systems require light buffing for reliable adhesion, and skipping this step when it is required causes full-surface lifting within 48 hours.
Step 4: Clean the Nail Plate
After filing, cuticle work, and buffing, the nail plate is contaminated with dust, natural oils, cuticle remover residue, and moisture from the client’s hands. This contamination must be removed immediately before applying dehydrator. Use a lint-free wipe saturated with isopropyl alcohol (70% or higher) or a dedicated nail surface cleanser.
Wipe each nail from cuticle to free edge in one smooth motion, then discard the wipe. Do not reuse wipes across multiple nails as this transfers contamination. The cleaning step must be performed immediately before dehydrator application. Cleaning the nails earlier in the appointment and then touching them during subsequent work reintroduces contamination.
Avoid using hand sanitiser, household cleaners, or water for nail plate cleaning. Hand sanitiser contains moisturisers and additives that leave residue. Water does not remove oils effectively and may introduce additional moisture. Isopropyl alcohol or professional nail cleanser are the only appropriate cleaning agents for gel prep.
Step 5: Apply Dehydrator
Dehydrator removes water and oils from the surface layers of the nail plate, creating a temporarily dry surface that allows base coat to achieve full contact with the keratin. Apply dehydrator across the entire nail plate using a lint-free wipe or the product’s applicator brush. Do not allow dehydrator to pool on the skin or cuticle area.
Allow the dehydrator to evaporate completely before proceeding to primer application. This typically requires 30–60 seconds. The nail surface should feel dry to the touch and may appear slightly matte or chalky. Visible liquid remaining on the nail indicates insufficient evaporation time.
Dehydrator loses effectiveness within two to five minutes as moisture from deeper nail plate layers migrates back to the surface. This is why the timing between dehydrator, primer, and base coat application is critical. The entire sequence must be completed rapidly on each nail to maintain the dehydrated surface state.
Step 6: Apply Primer
Primer creates a chemical bond between the natural keratin of the nail plate and the polymer chains in gel base coat. Apply primer in a thin, even layer across the entire nail plate immediately after dehydrator has evaporated. Most primers require only one coat. Over-application creates a thick, tacky layer that interferes with base coat curing.
Primer should cover the nail plate from cuticle to free edge, including the sidewall areas where lifting frequently initiates. Do not allow primer to contact the skin or eponychium. If skin contact occurs, remove the excess primer immediately with a clean wipe before it dries.
Verify whether your gel system requires acid-based or non-acid primer. These primer types are not interchangeable. Non-acid primers are safer for beginners and are compatible with most modern gel chemistries. Acid-based primers contain methacrylic acid that etches the nail plate and can cause chemical burns if applied incorrectly.
Base coat must be applied within 60–90 seconds of primer application whilst the primer is still active on the surface. If the primer has dried to a hard film before base coat application, the bonding opportunity is lost and adhesion will be compromised.
Step 7: Apply Base Coat
Base coat is applied immediately after primer whilst the primer surface is still active. Apply a thin layer of base coat across the entire nail plate, capping the free edge. Capping means drawing the brush across the free edge tip to seal the end of the nail. This prevents moisture from entering between the gel layers from the free edge.
Base coat should be thin enough that it self-levels but thick enough to provide structural support for the colour layers above. If base coat is applied too thickly, it may not cure completely and will remain tacky or soft beneath the colour coat. If applied too thinly, it provides inadequate adhesion and the colour coat bonds directly to the primer, which is not designed to support wear stress.
Cure the base coat according to your lamp manufacturer’s specifications, typically 30–60 seconds in LED lamps or 2 minutes in UV lamps. Under-curing creates a soft, incompletely polymerised base layer that fails under wear stress. Over-curing in some gel chemistries can cause the base coat to become brittle and crack.
After base coat is cured, proceed immediately to colour coat application. Do not touch the cured base coat surface with fingers or tools as this may deposit oils that interfere with colour coat adhesion. If the base coat surface becomes contaminated, cleanse it with alcohol on a lint-free wipe before applying colour.
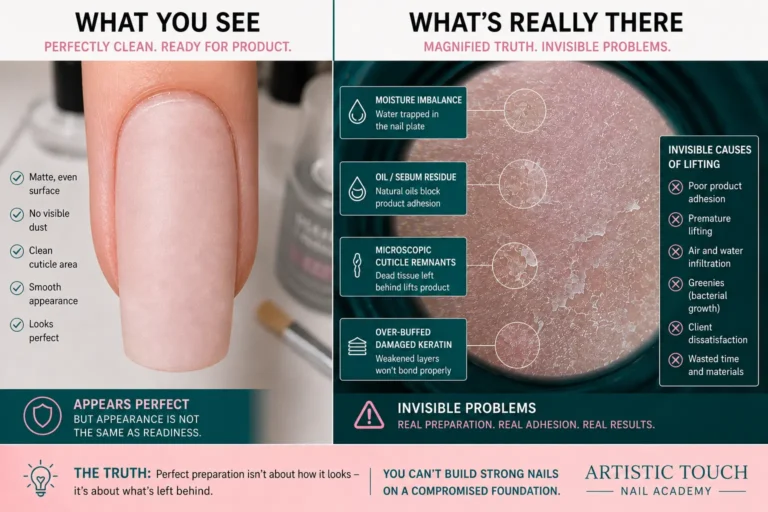
⚠️ Do Not Skip the Cleaning Step
Applying dehydrator and primer to a contaminated nail surface is the most common cause of early service failure in beginner work. Oil, dust, and cuticle remover residue create invisible barriers that prevent dehydrator and primer from reaching the nail plate. Always clean the nail with alcohol immediately before dehydrator application, even if the nail appears clean to the eye. Visible contamination is not required for adhesion failure to occur. Check your contraindications before performing gel services on clients with damaged nail plates or skin conditions.
Why Sequence and Timing Matter
Each prep step must be performed in this specific order because later steps depend on the completion of earlier steps. Dehydrator cannot work on a contaminated surface. Primer cannot bond to a moist nail. Base coat cannot adhere without active primer beneath it. Skipping steps or performing them out of sequence eliminates their effectiveness regardless of product quality.
The Nail Prep Course demonstrates the complete sequence with close-up video of hand positioning, brush control, and timing intervals. The course shows you what correct technique looks like at professional speed and what each step looks like when performed incorrectly, so you can identify and correct your own errors before they become habits.
Learn Professional Nail Prep
The Nail Prep Course provides step-by-step video demonstrations of the complete nail preparation sequence, including product application, timing protocols, and common error corrections. Designed for beginners and suitable for all gel systems.
Nail Prep Course →Lifetime access • Self-paced learning • Start immediately • Access from anywhere
Frequently Asked Questions
Do I need to buff nails before gel services?
Yes, most gel systems require light buffing to remove the natural shine and oils from the nail plate. Use a 180-grit or finer buffer with gentle pressure. Buffing creates microscopic texture that improves gel adhesion. Some modern gel systems claim buffing is optional, but verify your specific product’s technical requirements before skipping this step.
What is the correct order for gel prep?
The correct sequence is: file and shape, push back cuticles, remove cuticle from nail plate, buff nail surface, clean with alcohol, apply dehydrator, apply primer, apply base coat. Each step must be completed in this order. Skipping or reordering steps causes premature lifting.
Can I use acetone instead of dehydrator?
Acetone can temporarily dehydrate the nail surface, but it is not formulated specifically for gel prep and may leave residue that interferes with primer bonding. Professional nail dehydrator products are designed to evaporate cleanly without leaving film. Use proper dehydrator for reliable results, particularly when learning correct prep technique as a beginner.
How long should gel prep take?
The dehydrator-primer-base coat sequence should be completed within two to three minutes per nail to maintain surface conditions. The complete prep including filing, cuticle work, and buffing typically requires 15–25 minutes for a full manicure, depending on the client’s nail condition and cuticle growth. Speed increases with experience, but beginners should prioritise technique accuracy over speed.
Why does gel lift at the cuticles?
Lifting at the cuticle area typically indicates incomplete cuticle removal from the nail plate. The thin layer of dead tissue adhered to the nail surface prevents base coat from bonding directly to the keratin. Remove all cuticle tissue before proceeding to buffing and dehydrator application. Base coat must also extend close to the eponychium without flooding it.
About the Author
Radina Ignatova
Professional Nail Expert | International Nail Educator
I am Radina Ignatova, a Professional Nail Expert since 2014 and International Nail Educator, based in Scotland, UK. I am the Founder of Artistic Touch Nail Training Academy and TheNailWiki.
At Artistic Touch Nail Training Academy, I provide structured professional online nail courses specialising in dual forms, gel systems, polygel application, advanced nail structure, E-File work and Russian Manicure, with a strong focus on professional salon safety. I continue to work actively in salon practice, ensuring that all education reflects real client scenarios and current industry standards.
My teaching philosophy is simple: I show real salon challenges, real mistakes and real performance testing, not just perfect demonstrations. This is how you develop genuine technical competence and become a confident, capable nail professional.
Every Artistic Touch course includes lifetime access, where I provide ongoing guidance and professional feedback.
Disclaimer: This content is for educational purposes only. Nail services should be performed by trained professionals following current hygiene and safety regulations. Always carry out a full client consultation and check for contraindications before performing any nail service.
About Artistic Touch Nail Training Academy
Artistic Touch Nail Training Academy delivers structured professional online nail education focused on practical skill development, professional standards and safe salon practice. All courses are available online worldwide.