Why Your Nail Structure Is Not Working (Even If You Follow Tutorials)
Quick Answer: Why Does Nail Structure Fail Despite Following Tutorials?
Tutorials demonstrate apex placement visually but do not teach structural mechanics, stress distribution principles or how to adapt placement to individual nail geometry. Your apex may look centred but fails mechanically because it does not align with the nail’s natural stress curve or compensate for structural weaknesses.
This article explains why visual replication does not produce structural integrity and what professional nail structure training actually teaches.
When Visual Guidelines Produce Mechanical Failures
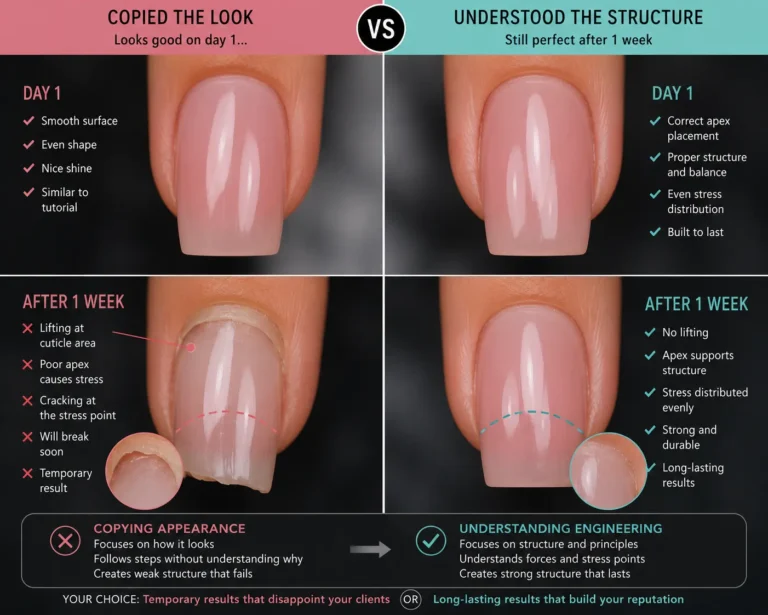
You follow nail structure tutorials exactly. You place your apex in the “middle third” as instructed. You create the dome shape demonstrated. Your enhancements still break, crack at stress points or flex excessively during normal use. You assume your application is incorrect because the tutorial result looked perfect while yours fails.
The actual problem is that tutorials teach visual apex placement—where the highest point appears—without teaching structural mechanics or stress distribution principles. Your apex looks correct from above. It fails mechanically because it does not align with how force travels through the nail during hand use.
Professional nail structure training teaches you why apex placement matters mechanically, how to identify the nail’s natural stress curve and how to position structural reinforcement where it will actually resist breaking forces rather than where it looks aesthetically balanced.
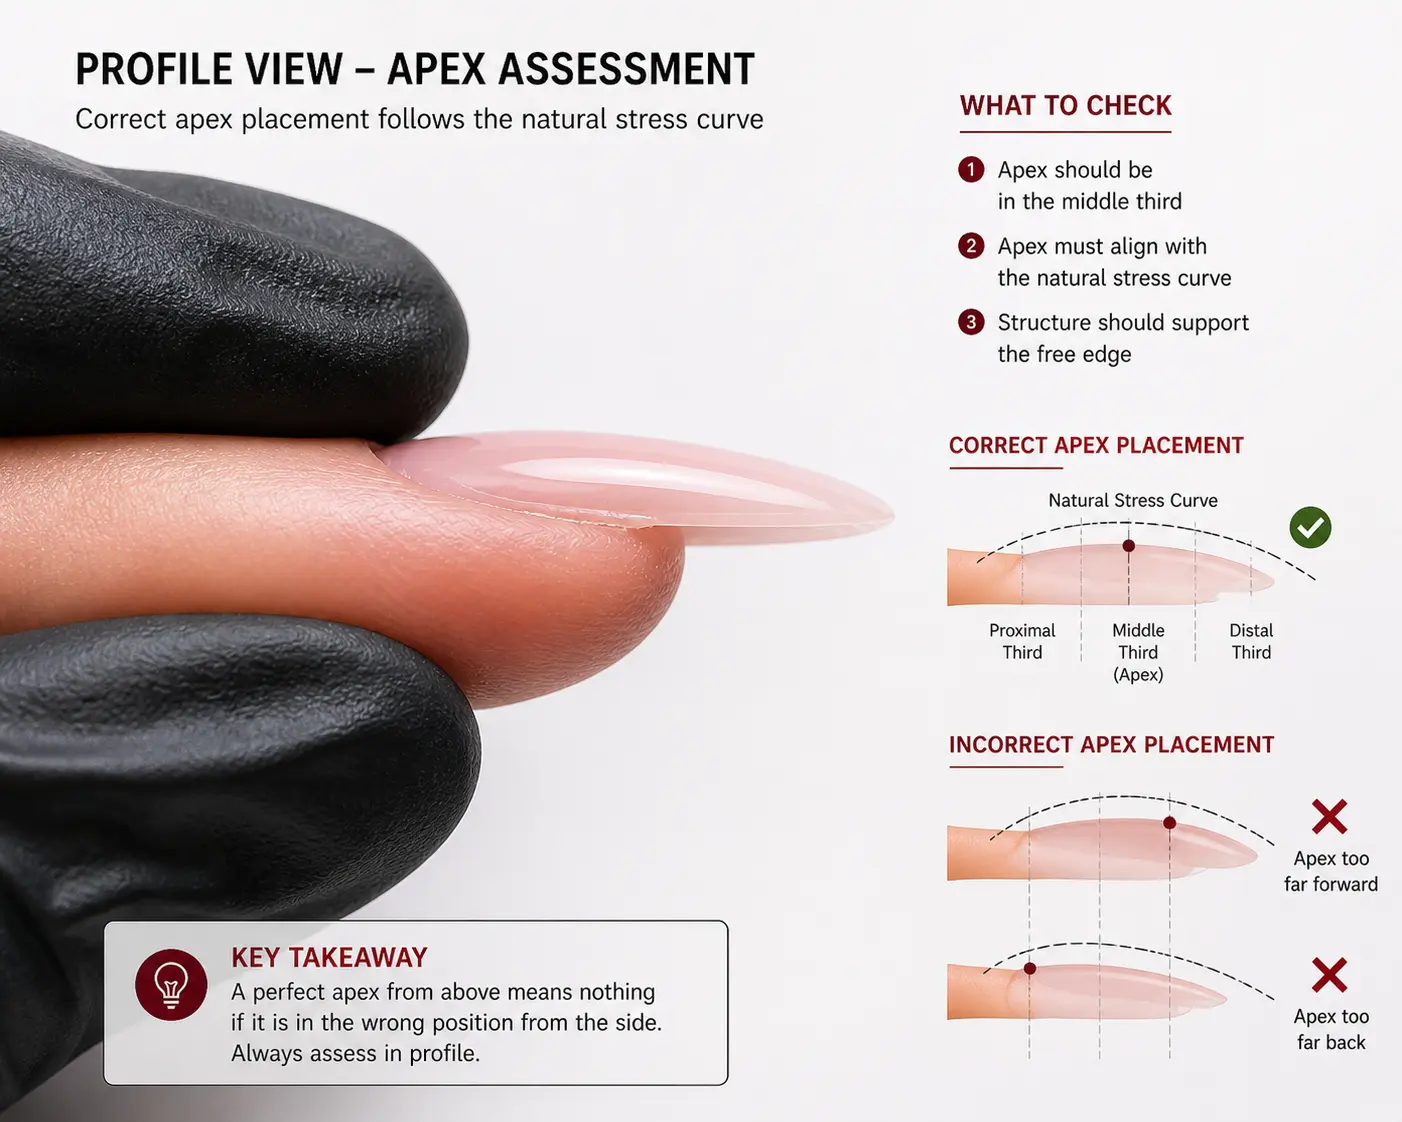
Why “Middle Third” Placement Often Fails
The “middle third” guideline tells you where to place apex based on visual nail length measurement. It assumes all nails have similar stress patterns and that visual centre corresponds to mechanical centre. Neither assumption is correct.
Nails with short nail beds require apex placement further back than middle third to compensate for reduced natural plate support. Nails with pronounced natural curves require apex positioning that follows the curve rather than contradicting it. Nails with previous damage require structural compensation that visual guidelines do not address.
Professional structural training teaches you to assess individual nail geometry, identify natural stress curves and position apex relative to mechanical requirements rather than visual measurement. This is what produces enhancements that withstand normal use forces.
What Tutorials Do Not Show You About Stress Distribution
When a client uses their hands normally—typing, opening containers, gripping objects—force travels through the nail enhancement in predictable patterns. If your structural apex does not intercept these force lines, the enhancement flexes, weakens and eventually fails.
Tutorials show you finished apex shape. They do not show you how force travels from the free edge impact point back through the enhancement to the nail plate, why apex positioned too far forward allows excessive flex at the proximal zone, or how lateral walls distribute sideways stress that causes cracking.
Professional courses demonstrate force distribution using pressure testing, show you what happens when apex placement is too far forward or too far back and teach you to assess structural integrity before the client leaves rather than discovering weakness when the enhancement breaks days later.
The Thickness vs Strength Misconception
Many nail technicians respond to structural failures by adding more product, creating thicker enhancements and assuming that more material equals more strength. This approach often makes the problem worse.
Excessive thickness in the wrong location adds weight without adding structural support. An enhancement with thick sidewalls but inadequate apex will still break at the stress concentration point. An enhancement with product bulk at the free edge but weak proximal zone will crack where force transfers to the natural nail.
Professional structural training teaches you where reinforcement actually resists breaking forces—at the apex aligned with the stress curve, at lateral stress concentration points and at the proximal transition zone. Targeted reinforcement at these locations produces stronger enhancements than random thickness throughout.
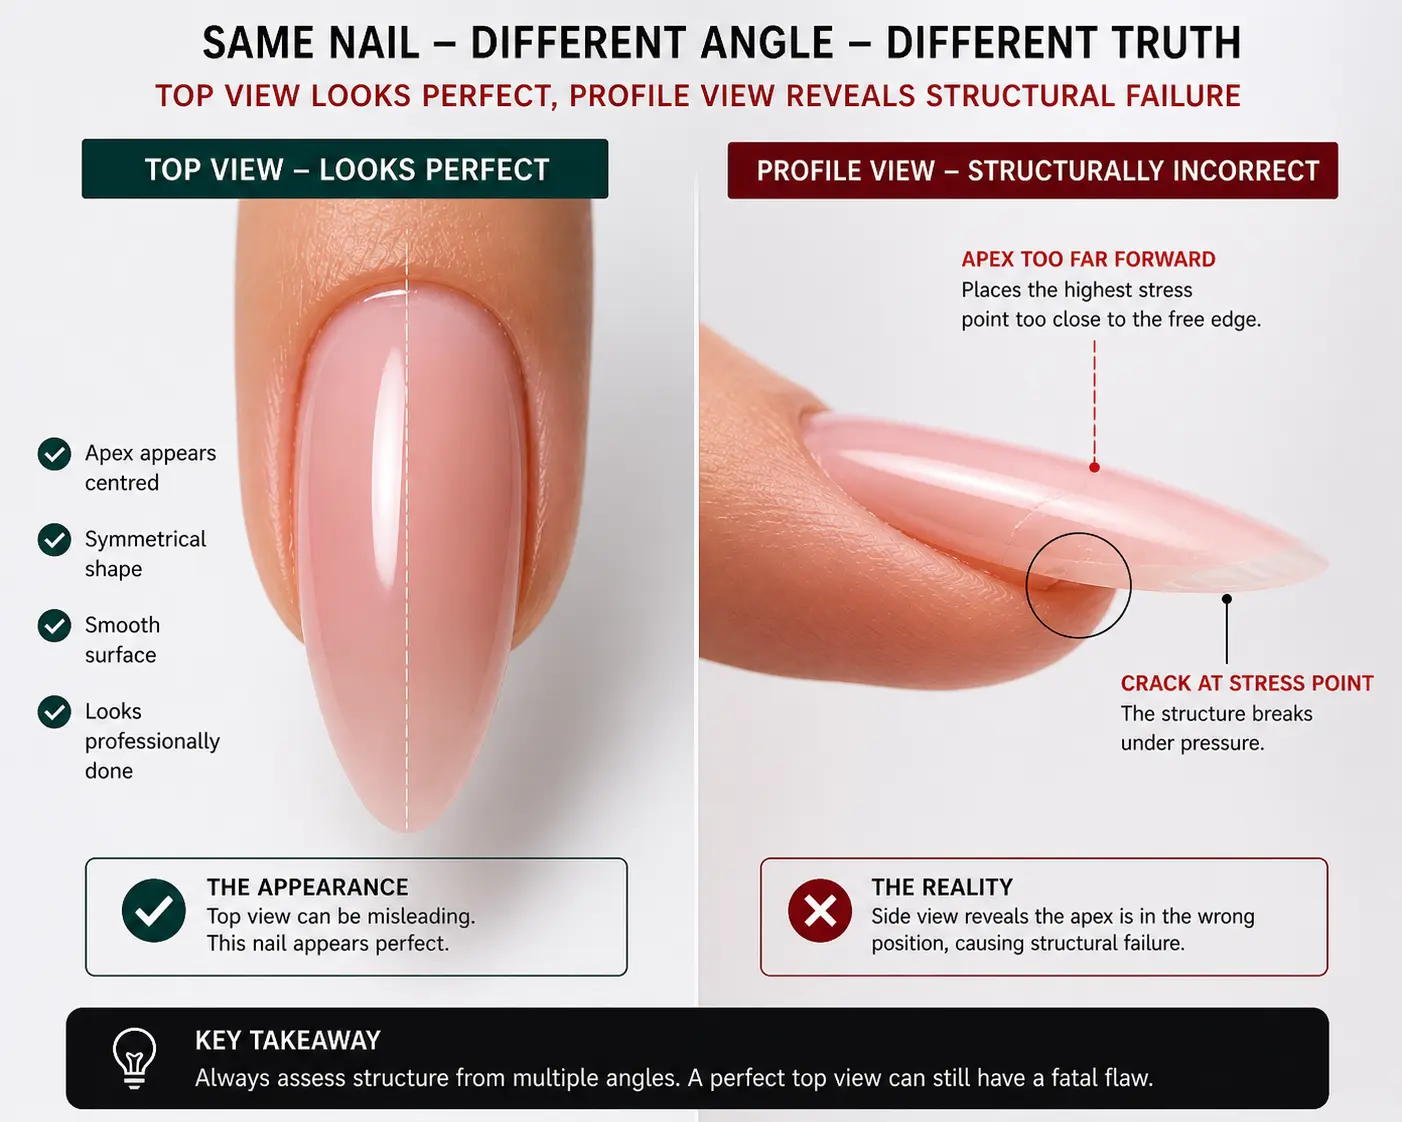
Why Your Apex Looks Right But Performs Wrong
Visual assessment from above shows you apex height and general dome shape. It does not show you whether the apex actually intercepts force lines, whether lateral walls provide adequate bracing or whether the proximal transition distributes stress appropriately.
Your apex might look perfectly centred from top view while being positioned too far forward in profile view, creating a leverage point that causes proximal cracking. Your dome might appear smooth from above while having inadequate curvature in cross-section, allowing sideways flex that leads to lateral splitting.
Professional structural assessment requires viewing enhancements from multiple angles—top, side, end-on—and testing mechanical properties through controlled pressure application. If you assess only from above, you miss the structural failures that will cause breaking.
How Individual Nail Geometry Changes Structural Requirements
Tutorials typically demonstrate on ideal nail models: medium length nail beds, gentle natural curves, no previous damage, good natural strength. Your clients’ nails vary significantly from this ideal, and structural requirements change accordingly.
Short nail beds provide less natural support platform, requiring apex placement that compensates with enhanced proximal reinforcement. Steep natural curves create sideways stress concentration, requiring lateral wall strengthening that flat nails do not need. Damaged nail plates with compromised integrity require structural compensation strategies that healthy nails do not.
Professional training teaches you to assess individual nail geometry, identify structural challenges specific to that nail and adapt apex placement, product distribution and reinforcement strategy accordingly. Generic “middle third” placement cannot address these variations.
The Missing Link: Material Properties and Curing
Structural integrity depends not just on where you place product but on whether that product achieves complete polymerisation and proper hardness. Under-cured builder gel at the apex location creates a weak point regardless of correct placement. Uneven curing that leaves the centre softer than the edges produces structural failure under stress.
Tutorials rarely address curing verification or material properties. They assume your lamp output is adequate, your cure time is correct and your product achieves full hardness. When any of these assumptions is wrong, your structure fails even when placement follows the demonstration.
Professional courses teach you to verify complete curing through hardness testing, check for flex that indicates under-polymerisation and understand how different product viscosities affect structural performance. This ensures that proper apex placement is supported by proper material properties.
Why Practice Without Diagnosis Does Not Fix Structural Problems
If your apex placement follows an incorrect reference point or your structural assessment misses critical weaknesses, completing fifty more enhancements will not correct the error. Practice reinforces your current execution pattern, whether that pattern is structurally sound or not.
Structural improvement requires diagnostic ability: understanding why a specific placement failed, identifying which mechanical principle was violated and knowing the exact adjustment that will prevent recurrence. Without this diagnostic framework, you repeat the same structural errors and experience the same failures regardless of practice volume.
Professional structural training provides this framework by teaching you stress mechanics, showing you multiple failure modes, explaining the mechanical cause of each and demonstrating the structural corrections that eliminate them.
What Professional Structural Training Teaches
The difference between following tutorials and achieving reliable structural integrity is understanding mechanical principles rather than just visual guidelines. Tutorials show you where apex looks centred. Professional training teaches you where apex needs to be positioned to resist actual use forces.
When you understand stress distribution, can assess individual nail geometry and know how to verify structural integrity through testing rather than visual inspection alone, your enhancements stop breaking and start performing reliably under normal client use.
Learn Structural Mechanics, Not Just Visual Placement
Artistic Touch online nail courses teach stress distribution principles, structural assessment and apex positioning based on mechanical requirements rather than visual guidelines. Build enhancements that withstand real client use.
View All Courses →Lifetime access • Private student community • Start immediately
Frequently Asked Questions
Where should the apex be on a nail enhancement?
Apex position depends on individual nail geometry and stress patterns, not fixed measurements. Professional placement aligns apex with the nail’s natural stress curve to intercept force lines during normal use. Short nail beds typically require apex further back than long nail beds. Curved nails require different positioning than flat nails.
Why do my nail enhancements keep breaking?
Repeated breaking indicates structural weakness, typically from incorrect apex placement that does not align with stress distribution, inadequate lateral wall reinforcement at stress concentration points, insufficient proximal zone strength or under-cured product at critical structural locations. The breaking pattern reveals which structural element failed.
How can I tell if my nail structure is correct?
Correct structure withstands normal use forces without breaking, shows appropriate apex alignment with the natural stress curve when viewed in profile, demonstrates adequate lateral wall support and maintains integrity for 2-3 weeks minimum. Visual assessment from multiple angles plus controlled pressure testing reveals structural adequacy better than top-view appearance alone.
Does making enhancements thicker make them stronger?
Thickness adds strength only when placed at locations that resist actual stress forces. Random thickness throughout the enhancement adds weight without structural benefit. Targeted reinforcement at apex, lateral stress points and proximal transition zones produces stronger results than overall thickness.
Why does my structure look perfect but still fail?
Visual perfection from top view does not guarantee structural integrity. Enhancements that appear correctly shaped from above can have apex positioned incorrectly in profile view, inadequate lateral reinforcement not visible from above or under-cured product at the apex despite correct placement. Structural assessment requires multiple viewing angles and mechanical testing.
How do I adapt nail structure for different nail shapes?
Different nail geometries require different structural strategies. Short nail beds need apex positioned for maximum proximal reinforcement. Curved nails need lateral wall strengthening. Flat nails need different apex curvature than highly arched nails. Professional training teaches you to assess individual geometry and adapt structure accordingly rather than using one placement for all nails.
About the Author
Radina Ignatova
Professional Nail Expert | International Nail Educator
I am Radina Ignatova, a Professional Nail Expert since 2014 and International Nail Educator, based in Scotland, UK. I am the Founder of Artistic Touch Nail Training Academy and TheNailWiki.
At Artistic Touch Nail Training Academy, I provide structured professional online nail courses specialising in dual forms, gel systems, polygel application, advanced nail structure, E-File work and Russian Manicure, with a strong focus on professional salon safety. I continue to work actively in salon practice, ensuring that all education reflects real client scenarios and current industry standards.
My teaching philosophy is simple: I show real salon challenges, real mistakes and real performance testing, not just perfect demonstrations. This is how you develop genuine technical competence and become a confident, capable nail professional.
Every Artistic Touch course includes lifetime access and access to a dedicated student support group, where I provide ongoing guidance and professional feedback.
Disclaimer: This content is for educational purposes only. Nail services should be performed by trained professionals following current hygiene and safety regulations. Always carry out a full client consultation and check for contraindications before performing any nail service.
About Artistic Touch Nail Training Academy
Artistic Touch Nail Training Academy delivers structured professional online nail education focused on practical skill development, professional standards and safe salon practice. All courses are available online worldwide.