Stop Doing This: The Unsafe Sandwich Dual Form Placement Method Causing Skin Contact and Lifting
Quick Answer: What is the correct sandwich dual form bottom placement method?
The safe method involves placing the bottom form under the nail first, securing it with your finger, then using a minimal amount of gel product to join the form to the natural nail plate before flash curing. Flooding the form with product before placement creates skin contact at the hyponychium and sidewalls, leading to potential sensitisation, a built-in ridge after 2–3 weeks of growth, and increased lifting risk.
The video demonstration below shows both the unsafe flooding method and the correct placement-first technique in real application.
Watch: Sandwich Dual Form Bottom Placement—Safe Versus Unsafe Methods
This demonstration shows exactly what happens underneath the nail when you flood the bottom form with product before placement, and how the safe placement-first method eliminates all three problems: skin contact, ridge formation, and lifting risk.
Why Most Sandwich Dual Form Applications Look Clean From the Top But Create Problems Underneath
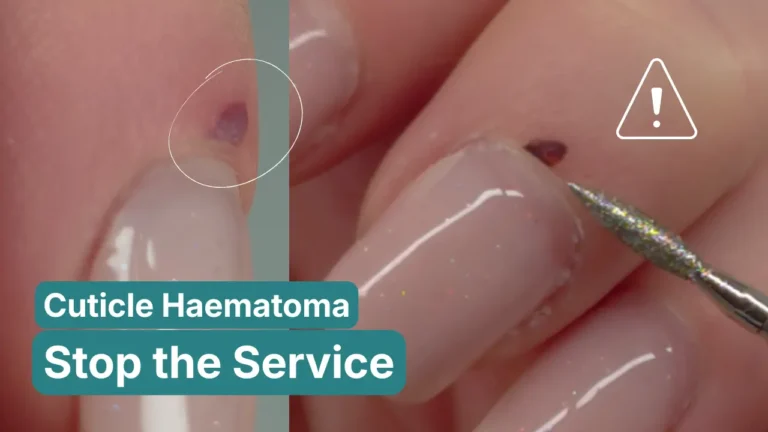
Most sandwich dual form applications you see online look perfect from the top. Underneath, however, they create three serious problems: skin contact that can lead to sensitisation, a built-in ridge that appears after two to three weeks of growth, and increased risk of lifting. The difference between safe and unsafe application comes down to one critical step: when you apply the gel product.
The flooding technique—applying excess gel product to the bottom form before positioning it under the nail—appears frequently in online demonstrations because it photographs well and creates visually clean top surfaces. Professional assessment of the underside, however, reveals three predictable problems: gel pushed into the hyponychium, product contact with lateral nail folds, and excess material accumulation that creates structural weakness.
The Unsafe Flooding Method: What Happens When You Apply Product Before Placement
The common technique demonstrated across social media involves flooding the bottom sandwich dual form with gel product before placement. Technicians apply excess product to the form, then fit it onto the nail and cure. From the top view, the result appears clean and professional.
The problem becomes visible when you examine the underside. Excess product gets pushed into exactly the areas where it should not be: the hyponychium (the skin under the free edge) and the lateral nail folds (the skin along the sides). This creates direct skin contact with uncured gel throughout the entire curing process—a known sensitisation risk.
Additionally, the high concentration of product underneath the nail creates a structural issue. As the nail grows out over two to three weeks, a visible ridge or step forms at the application line. This ridge often leads to lifting, as the thick product layer cannot flex naturally with nail growth.
⚠️ Sensitisation Risk: Why Skin Contact Matters
Uncured gel product contacting the skin creates potential for contact sensitisation. The flooding method violates fundamental safety principles by design, forcing product into contact with living tissue throughout positioning, adjustment, and curing. Understanding proper contraindications and safety protocols is essential for responsible professional practice.
Why Product Placement Timing Determines Where Gel Travels
When you flood the form with product before placement, you lose control over where that product goes. The act of pressing the form onto the nail forces the gel outward in all directions. Even if you wipe away visible excess, product remains trapped against the skin underneath and along the sidewalls.
The gel has not yet cured, so it maintains contact with living tissue throughout the entire curing process. This extended contact time increases sensitisation risk, particularly for clients who have frequent nail services or existing sensitivities.
The structural consequence appears later. That excess product under the nail creates an uneven foundation. Natural nails flex slightly with everyday use. A thick, rigid product layer underneath cannot flex at the same rate, which creates stress at the junction between the enhancement and the natural nail. This stress often results in lifting at the sidewalls or tip.
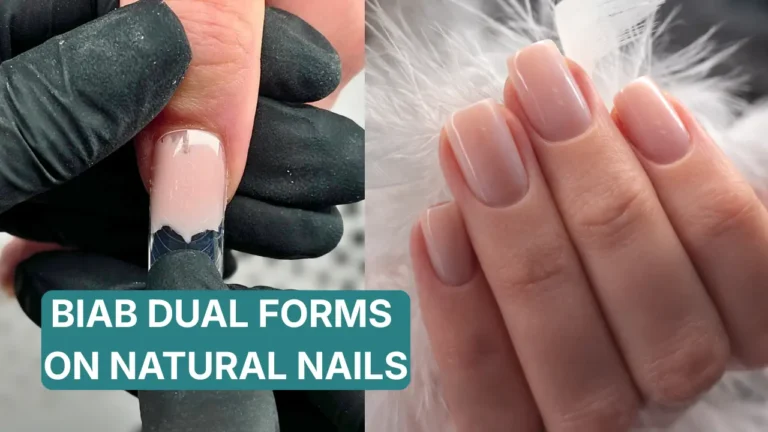
The Safe Sandwich Dual Form Method: Placement First, Product Second
The correct technique reverses the order of operations. You place the bottom sandwich dual form under the nail first, without any product on it. Use your finger to set the form snugly against the natural nail, ensuring proper alignment and contact.
Once the form is positioned correctly, you apply a minimal amount of gel product at the junction between the form and the natural nail plate. This product serves one purpose only: to hold the bottom form in position. It is not building structure or creating adhesion to the skin.
The amount of gel required is surprisingly small. A single small drop is typically sufficient. You are joining two surfaces together, not creating a foundation layer. After application, flash cure immediately to set the form in place.
This method eliminates skin contact entirely when executed correctly. The gel touches only the natural nail plate and the sandwich form itself. The underside remains clean, with no product pushed into the hyponychium or lateral folds.
What Technicians Struggle With Most: Product Control, Positioning, and Flash Curing
The sandwich dual form system requires precision in three areas: product control, form positioning, and flash curing technique. Most struggles occur because technicians treat this as a single action rather than a sequence of controlled steps.
Product control means using the minimum amount necessary to achieve secure attachment. Too much product recreates the flooding problem, even if applied after placement. Too little product results in forms that shift during the building process.
Form positioning requires understanding how the sandwich form should sit relative to the natural nail. The form must follow the natural curve without gaps, but it cannot press so tightly that it distorts the nail plate. This balance becomes automatic with practice, but initial attempts often position the form too loosely or too tightly.
Flash curing technique determines whether the form stays in position during the building phase. Insufficient curing allows the form to shift when you apply the top layer. Over-curing can create heat spikes that cause client discomfort. The flash cure duration must be calibrated to your specific lamp output and gel formulation.
Why This Is Real Nail Application, Not Camera-Optimised Demonstration
The techniques demonstrated in the video reflect actual salon practice on real nails, not idealised demonstrations created specifically for camera. This distinction matters because many online tutorials show what looks good on screen rather than what works consistently in professional service delivery.
Real nails present variables that controlled demonstrations can avoid: different nail plate flexibility, varying moisture levels, natural oils that affect adhesion, and clients who cannot remain perfectly still during application. The safe placement method works across these variables because it relies on mechanical positioning rather than product volume to achieve attachment.
Learn the Complete Sandwich Dual Form System
The Sandwich Dual Forms Online Course breaks down every placement decision, product application choice, and troubleshooting scenario you will encounter in professional practice. This is professional training that addresses why techniques work, when they fail, and how to adapt them to real salon conditions.
Sandwich Dual Forms Online Course — £97 →Lifetime access • Private student community • Direct access to Radina • Start immediately
Frequently Asked Questions
Why does the flooding method create skin contact issues?
When gel product is applied to the form before placement, pressing the form onto the nail creates hydraulic pressure that forces uncured gel outward. This product travels to areas of least resistance: the hyponychium and lateral nail folds. The gel maintains direct contact with living tissue throughout positioning, adjustment, and curing, creating extended exposure that increases sensitisation risk.
How much gel product should be used to secure the bottom form?
A single small drop of gel typically provides sufficient adhesion when the form is properly positioned mechanically. The product serves only to secure the form during building—it is not creating structure or filling gaps. Proper mechanical positioning reduces product requirements to minimal amounts.
What causes the ridge that appears after two to three weeks of growth?
Excess product underneath the nail from flooding creates a thick ridge at the junction between the enhancement and natural nail. This high concentration of rigid product cannot flex at the same rate as the natural nail during everyday use, creating a visible and palpable step as the nail grows. This ridge often becomes the initiation point for lifting.
Can the safe method be used with all gel formulations?
The placement-first method works across gel formulations because it relies on mechanical positioning rather than product-specific properties. Flash cure timing may require adjustment based on specific gel viscosity and lamp output, but the fundamental sequence—position form first, apply minimal securing product, cure immediately—remains consistent regardless of product brand.
How do you know if the form is positioned correctly before applying product?
Correct positioning is achieved when the form follows the natural nail curve without gaps, sits snugly without creating excessive pressure, and maintains alignment parallel to the nail’s natural growth direction. Visual assessment from multiple angles combined with tactile feedback confirms proper positioning. The form should feel stable through mechanical contact alone before any product is applied.
Does the safe method take longer than the flooding method?
Initial application may take slightly longer as technicians adjust to the new sequence and develop precision in minimal product application. With practice, the safe method becomes faster than flooding because it eliminates the need to clean excess product from underneath and sidewalls. More importantly, it prevents the lifting and ridge formation that require early rebalancing appointments.
Can you switch to the safe method on a client who has existing enhancements?
The safe method can be implemented at any rebalancing or fill appointment. Existing enhancements applied with the flooding method will need to grow out naturally, but all new growth and fresh enhancements can be executed with correct placement technique. Clients often notice improved comfort and durability even when existing enhancements remain on some nails whilst new applications use the safer method.
About the Author
Radina Ignatova
Professional Nail Expert | International Nail Educator
I am Radina Ignatova, a Professional Nail Expert since 2014 and International Nail Educator, based in Scotland, UK. I am the Founder of Artistic Touch Nail Training Academy and TheNailWiki.
At Artistic Touch Nail Training Academy, I provide structured professional online nail courses specialising in dual forms, gel systems, polygel application, advanced nail structure, E-File work and Russian Manicure, with a strong focus on professional salon safety. I continue to work actively in salon practice, ensuring that all education reflects real client scenarios and current industry standards.
My teaching philosophy is simple: I show real salon challenges, real mistakes and real performance testing, not just perfect demonstrations. This is how you develop genuine technical competence and become a confident, capable nail professional.
Every Artistic Touch course includes lifetime access and access to a dedicated student support group, where I provide ongoing guidance and professional feedback.
Disclaimer: This content is for educational purposes only. Nail services should be performed by trained professionals following current hygiene and safety regulations. Always carry out a full client consultation and check for contraindications before performing any nail service.
About Artistic Touch Nail Training Academy
Artistic Touch Nail Training Academy delivers structured professional online nail education focused on practical skill development, professional standards and safe salon practice. All courses are available online worldwide.