How Nail Anatomy Actually Affects Product Retention (And What You Can Do About It)
Quick Answer: How Does Nail Anatomy Affect Product Retention?
Natural nail structure, flexibility, curvature, and growth patterns directly determine how well products like BIAB, gel polish, and enhancements adhere and last. Flexible nails bend under daily stress, breaking adhesion bonds. Downward or hooked nails experience concentrated pressure at the free edge. High oil content prevents proper bonding. Growth direction affects apex placement and structural stability.
Key anatomical factors affecting retention: Nail plate flexibility (soft versus rigid), natural curvature (flat, upward, downward), growth direction, oil content, nail plate thickness, and surface texture.
Professional solution: Adapting your technique to each client’s unique nail anatomy—adjusting apex height, product viscosity, curing protocols, and preparation methods—is essential for achieving 3-4 week retention.
Why Nail Anatomy Is the Missing Piece in Your Retention Puzzle
You follow the preparation protocol perfectly. You use high-quality products. You cure correctly and apply precisely. Yet some clients experience lifting at day 5 whilst others enjoy flawless retention for 4 weeks. The frustrating truth? The difference often has nothing to do with your technique.
The natural nail itself—its structure, flexibility, curvature, and biological characteristics—determines approximately 60% of your retention success. Understanding these anatomical factors transforms you from a technician who reacts to problems into an expert who prevents them.
After training over 200 certified nail technicians and working with thousands of clients with vastly different nail types, I can tell you this: mastering nail anatomy is the difference between acceptable results and exceptional retention.
Understanding the Nail Plate: Your Foundation for Retention
The nail plate is not a single uniform structure. It consists of three distinct keratin layers, each with different properties that affect how products adhere and perform.
The Three Layers of the Nail Plate
The nail plate is composed of approximately 100-150 layers of dead, flattened keratin cells arranged in three distinct zones:
- Dorsal layer (top surface): The hardest, most compact layer. This is where you prepare and where products adhere. Over-filing damages this crucial adhesion surface.
- Intermediate layer (middle): The thickest layer, providing structural strength and flexibility. This layer determines the nail’s overall mechanical properties.
- Ventral layer (underside): The softer, more porous layer attached to the nail bed. This layer provides grip and connection to living tissue.
Why This Matters for Product Retention
When you over-file during preparation, you remove the dorsal layer—the very surface designed for optimal adhesion. This exposes softer intermediate layers that cannot hold products as effectively. The result? Premature lifting, usually starting at the cuticle area within 3-7 days. Proper e-file technique preserves the dorsal layer whilst removing surface oils and shine.
Nail Plate Thickness and Its Impact on Product Choice
Natural nail plate thickness varies significantly between individuals, typically ranging from 0.5mm to 0.8mm. This variation directly affects which products will perform best and how you should apply them.
✓ Thin Nail Plates (0.5-0.6mm)
Characteristics: Highly flexible, prone to bending, often translucent appearance.
Best products: Medium to hard BIAB formulations that provide external structural support. Avoid soft gels that flex with the nail.
Application strategy: Build a proper apex (highest point at 60% of nail length) to create structural integrity. Use encapsulation technique for maximum support.
✓ Thick Nail Plates (0.7-0.8mm)
Characteristics: Rigid, resistant to bending, often opaque appearance.
Best products: Soft to medium BIAB formulations work well. These nails have their own structural integrity.
Application strategy: Focus on adhesion rather than structure. Lighter apex is sufficient. Prioritize proper preparation and dehydration to ensure bonding on this denser surface.
Nail Flexibility: The Most Underestimated Retention Factor
Nail flexibility is perhaps the single most important anatomical factor affecting product retention, yet it is rarely discussed in basic training. Every time a client uses their hands, their nails flex. When the natural nail flexes more than the enhancement product, the adhesion bond breaks.
Understanding the Flexibility Spectrum
Natural nails exist on a flexibility spectrum from highly rigid to extremely soft and bendable. This flexibility is determined by keratin structure, moisture content, and genetic factors.
⚠️ Common Mistake: Using Soft Products on Flexible Nails
Many technicians default to soft or medium BIAB formulations because they are easier to file and shape. However, on highly flexible nails, soft products flex along with the natural nail, creating movement within the enhancement layer itself. This internal stress causes delamination and lifting. Flexible nails require rigid products that provide external structural support—essentially creating an exoskeleton that prevents the nail from bending excessively.
How Daily Activities Create Flex Stress
Understanding where flex stress occurs helps you reinforce vulnerable areas during application:
- Typing and computer work: Repeated downward pressure on nail tips causes upward flex at the cuticle area
- Opening car doors and containers: Lateral (sideways) pressure creates flex at sidewalls
- Picking up objects: Pinching motions create compression flex across the nail plate width
- Hair washing and styling: Prolonged water exposure combined with mechanical stress amplifies flex
Nail Curvature and Growth Direction: Hidden Retention Killers
Natural nail curvature—the three-dimensional shape of the nail as it grows—is one of the most frequently overlooked anatomical factors in retention problems. The direction a nail grows (upward, straight, or downward) fundamentally changes how stress distributes across the enhancement.
The Three Primary Nail Growth Patterns
Nails grow in one of three primary directions, each presenting unique challenges for product retention:
- Upward Growth (Ski Jump Nails) – The nail curves upward from the nail bed, creating a convex shape. These nails naturally lift away from the finger, which can actually improve retention because there is less pressure on the free edge. Challenge: The pronounced curve can make apex placement difficult. Products may pool at the cuticle if not applied carefully.
- Straight Growth (Flat Nails) – The nail grows relatively flat with minimal curvature. These are the easiest nails for product retention. Challenge: Minimal. Standard application techniques work well. Focus on proper preparation and adhesion.
- Downward Growth (Hooked or Claw Nails) – The nail curves downward towards the fingertip, creating a concave or hooked shape. This is the most challenging growth pattern for retention. Challenge: Extreme pressure concentration at the free edge and cuticle area. Length adds leverage that pulls the enhancement away from the nail plate.
Why Downward Growth Destroys Retention
Downward or hooked nails are biomechanically problematic for enhancements. Here is why:
When a nail grows downward, every millimetre of length added creates leverage. The free edge acts as a lever arm, pulling downward and creating tension at the cuticle area where the product is bonded. This constant downward force works against adhesion 24 hours a day.
Additionally, the hooked shape concentrates pressure at specific stress points—typically the free edge and the area just behind the apex. Daily activities like typing or picking up objects amplify this pressure, causing microfractures in the adhesion bond that eventually manifest as lifting.
Professional Solution for Downward Growth Nails
Apex placement is critical. Move the apex slightly forward (to 65-70% instead of the standard 60%) to counteract the downward curve. Use a harder BIAB formulation to resist the bending force. Most importantly, keep length conservative—every extra millimetre multiplies the leverage working against you. For severe downward growth, consider recommending nail tips with proper sculpting to create a more biomechanically sound structure.
C-Curve and Lateral Curvature
Beyond growth direction, the lateral curvature (side-to-side curve, also called C-curve) affects retention:
- Flat C-curve: Minimal side-to-side curve. Products adhere well but nails may be more prone to side cracking without structural support
- Moderate C-curve: Ideal for retention. Natural curve provides structural strength whilst maintaining good contact surface
- High C-curve (tube nail): Nails curve dramatically from sidewall to sidewall. Challenge: Difficult to achieve full product contact along sidewalls. Risk of air pockets and incomplete adhesion
✓ Master Anatomy-Based Retention in Our BIAB Masterclass
- ✓ Detailed nail anatomy assessment protocols for every client
- ✓ Product selection strategies based on nail flexibility and thickness
- ✓ Apex placement adjustments for different growth patterns
- ✓ Real case studies solving retention problems through anatomical analysis
Natural Oils, Moisture, and Surface Conditions
The biological characteristics of the nail surface—particularly oil production, moisture content, and surface texture—create an invisible barrier that can prevent even the best products from bonding properly.
Nail Plate Oil Production
Natural nails secrete sebum (oil) from the nail bed and surrounding skin. This oil travels through the microscopic channels in the nail plate layers, reaching the surface. Some individuals have significantly higher oil production than others, which directly affects adhesion.
High oil production indicators:
- Shiny nail surface even without polish
- Oily skin on hands and around cuticles
- History of product lifting within first week
- Products “slide” during application before curing
Dehydration Protocol for High-Oil Nails
For clients with high oil production, standard preparation is insufficient. After e-file preparation, cleanse with isopropyl alcohol (99% concentration preferred). Follow immediately with a dedicated nail dehydrator or pH balancer—products specifically designed to draw moisture and oils from the nail plate. Allow 60 seconds for complete evaporation before primer application. This creates a receptive surface for adhesion. Skipping this step on oily nails virtually guarantees lifting within 7 days.
Moisture Content and Hydration Cycles
The nail plate absorbs and releases moisture continuously throughout the day. This hydration cycle causes the nail to expand when wet and contract when dry. Products must accommodate this natural movement.
Impact on retention:
When a client washes dishes, showers, or swims, their nails absorb water and expand. When they dry out (sleeping with heating on, working in air-conditioned environments), nails contract. This expansion-contraction cycle creates microscopic stress on the adhesion bond. Over 3-4 weeks, this stress accumulates, eventually causing the bond to fail.
Professional strategy: Advise clients to wear gloves during prolonged water exposure (washing up, cleaning). This single behavioural change can extend retention by 7-10 days for clients with high water exposure.
Surface Texture and Peeling Nails
Some clients present with naturally peeling or flaking nails. This indicates delamination between the nail plate layers—the dorsal layer is separating from the intermediate layer. Applying products to peeling nails is like painting over wallpaper that is already coming off the wall.
Important: Clients with actively peeling nails should focus on nail health restoration before enhancement application. Recommend cuticle oil application twice daily, biotin supplementation (consult their GP first), and a 4-6 week break from enhancements. Attempting to apply BIAB or gel polish to peeling nails will result in poor retention and potential further damage. Your professional integrity is worth more than one appointment fee.
Growth Rate and Its Effect on Retention Timeline
Natural nail growth rate varies significantly between individuals and even between different fingers on the same hand. Average growth is approximately 3mm per month, but this can range from 2mm to 4mm depending on age, health, season, and genetics.
Why Growth Rate Matters for Product Performance
As the natural nail grows, the enhancement is carried forward on the nail plate. This creates a visible gap at the cuticle area (growth line). However, growth also creates biomechanical stress:
- Leverage increase: As the nail grows longer, the free edge extends further from the nail bed, increasing flex leverage
- Cuticle area stress: New nail growth pushes against the cured product at the cuticle, potentially causing lifting if the product is too rigid or too thick in this area
- Weight distribution change: The centre of gravity shifts as length increases, changing where pressure concentrates during daily activities
Matching Service Intervals to Growth Rate
Standard nail service intervals of 2-3 weeks are based on average growth rates. However, clients with faster or slower growth may need adjustments:
Practical Application: Adapting Your Technique to Nail Anatomy
Understanding nail anatomy is valuable only when translated into practical technique adjustments. Here is how to assess each client and modify your approach for optimal retention.
The Pre-Service Anatomical Assessment
Before beginning any nail service, conduct a 60-second anatomical assessment. This evaluation determines your entire application strategy.
- Flexibility Test – Gently press on the free edge of the natural nail. Does it flex easily or resist bending? High flexibility requires harder products and structured apex placement.
- Curvature Analysis – View the nail from the side. Is it growing straight, upward, or downward? Check C-curve from the top view. Adjust apex position based on growth direction.
- Thickness Evaluation – Look at the nail from the free edge. Translucent appearance suggests thin nails. Opaque white appearance suggests thicker nails. This determines product viscosity choice.
- Surface Condition Check – Is the nail surface shiny (high oil), peeling (layer delamination), or rough (damage)? This determines preparation intensity and product choice.
- Growth Rate Estimation – Ask the client how often they notice visible regrowth with polish. Fast growers need more frequent appointments and thinner cuticle area application.
Product Selection Based on Anatomical Findings
Once you have assessed the nail anatomy, select products strategically:
BIAB Product Selection Matrix
Soft BIAB (flexible formula): Best for thick, rigid nails with upward or straight growth. These nails have their own structural integrity and do not require additional support from the product.
Medium BIAB (balanced formula): Best for average thickness nails with moderate flexibility and straight growth. This is your “default” choice for clients without extreme anatomical features.
Hard BIAB (rigid formula): Best for thin, highly flexible nails, especially those with downward growth. The rigid formula provides essential external structural support that these nails lack naturally. This is also ideal for clients who are heavy-handed or work with their hands extensively.
Apex Adjustment for Different Nail Anatomies
The apex—the highest point of the enhancement—is your primary structural control. Standard placement is at 60% of nail length measured from cuticle to free edge. However, anatomical variations require adjustments:
- Upward growth nails: Apex at 55-60%. The natural upward curve provides some structural support, so standard placement works well.
- Straight growth nails: Apex at 60%. Standard placement provides optimal balance.
- Downward growth nails: Apex at 65-70%. Moving the apex forward counteracts the downward curve and reduces cuticle area stress.
- Highly flexible nails: Increase apex height (thickness at the highest point) by 20-30% to provide rigidity. The apex should be noticeably more pronounced than on rigid nails.
“I used to get so frustrated when clients came back with lifting after just a week. I was doing everything ‘right’ according to basic training. Then I learned about nail anatomy in Radina’s BIAB Masterclass. Now I assess every client’s nail flexibility and growth pattern before choosing products. My retention problems disappeared almost overnight. Understanding the ‘why’ behind the technique made all the difference.”
— Sarah Mitchell, Artistic Touch Graduate ★★★★★
Preparation Intensity Based on Surface Condition
Not all nails require the same preparation intensity. Adjust your e-file technique based on surface characteristics:
- Shiny, oily nails: Thorough e-file preparation to remove surface oils. Use 180 grit or medium barrel bit. Follow with dehydrator and allow full evaporation time.
- Dry, normal nails: Light e-file preparation. Use 240 grit or fine barrel bit. Remove shine without excessive filing. Standard dehydrator application.
- Peeling or damaged nails: Minimal mechanical preparation. Use 320 grit or extra-fine bit only to smooth rough areas. Do not file aggressively as this will worsen peeling. Consider declining service if peeling is severe.
- Previously enhanced nails: Remove all previous product completely. Check for damage to natural nail. Assess whether the nail has recovered sufficiently for immediate re-application.
Common Retention Problems Solved Through Anatomical Understanding
Most retention failures can be traced back to a mismatch between nail anatomy and application technique. Here are the most common problems and their anatomical solutions.
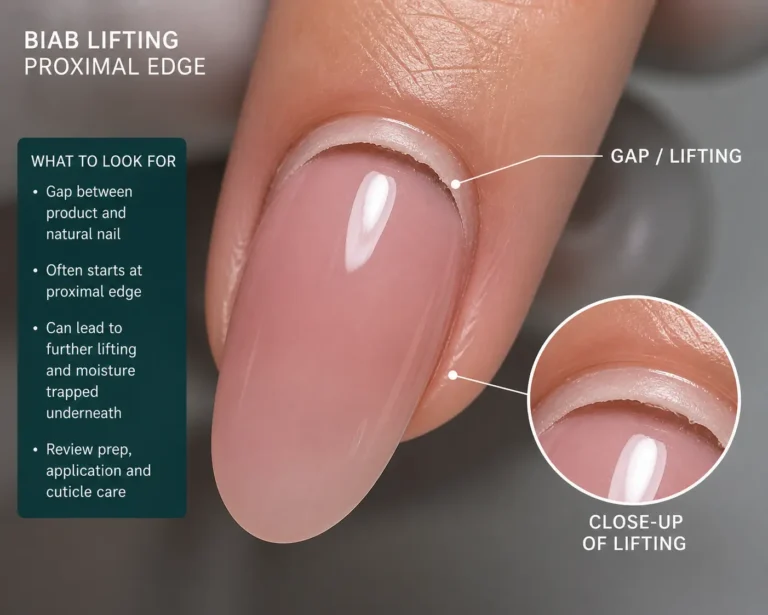
Problem: Lifting at Cuticle Area Within First Week
Anatomical Cause: High oil production or inadequate dehydration. Natural oils migrate from the nail bed through the nail plate layers, concentrating at the cuticle area where product is thinnest. This creates a barrier preventing proper adhesion.
Solution:
- Increase preparation thoroughness—e-file until nail surface is matte with no shine remaining
- Use 99% isopropyl alcohol cleanse followed by dedicated nail dehydrator
- Allow full 60 seconds for dehydrator evaporation before applying primer
- Apply acid-free primer specifically at cuticle area with precise application
- Keep product application thin at cuticle—avoid bulk that creates leverage points
- Ensure product is cured fully at cuticle area (rotate finger position during curing if needed)
Problem: Free Edge Cracking or Breaking
Anatomical Cause: Thin, flexible nails with inadequate apex support. The free edge acts as a lever, and without structural reinforcement, daily pressure causes the enhancement to crack at the stress point.
Solution:
- Switch to harder BIAB formula that resists flex
- Build a more pronounced apex (20-30% higher than standard)
- Keep length conservative—every millimetre of length multiplies stress
- Encapsulate with two layers of product for increased strength
- Cap the free edge properly to seal and reinforce the vulnerable tip
- Consider nail tips for clients who require length but have highly flexible nails
Problem: Sidewall Lifting or Air Pockets
Anatomical Cause: High C-curve (tube nails) preventing full product contact along the lateral sidewalls. The dramatic curvature creates a gap between product and nail surface, allowing air pockets that eventually expand and cause lifting.
Solution:
- Use a thinner product viscosity that flows into curved areas more easily
- Apply product in the middle of the nail and use brush pressure to push it laterally towards sidewalls
- Work product under the curvature with deliberate brush strokes—do not just paint over the top
- Check for trapped air by viewing the nail at an angle before curing
- Use a slightly longer cure time to ensure complete polymerisation in curved areas
- Consider reducing C-curve slightly through careful shaping (if client wants flatter look)
“My mum has always had terrible retention with any nail enhancement—lifting after 4-5 days every single time. I assessed her nails properly after learning anatomical analysis. She has extremely oily nails with high flexibility and downward growth. I switched her to hard BIAB, moved her apex forward, and implemented a thorough dehydration protocol. She just completed week 4 with zero lifting. She actually cried—she has never in her life had her nails last this long.”
— Emma Thompson, Certified Nail Technician ★★★★★
Problem: Product Peeling Off in Sheets
Anatomical Cause: Natural nail surface has not been properly prepared, or the nail itself is peeling and unhealthy. The enhancement bonds to loose keratin layers rather than the stable dorsal layer, creating a weak adhesion that fails catastrophically.
Solution:
- Increase e-file preparation thoroughness—the nail must be completely matte with no shine
- Remove any loose or peeling keratin layers before application (these are not stable bonding surfaces)
- If the nail is actively peeling in sheets, decline service and recommend nail health restoration
- Ensure you are not over-filing and creating the peeling yourself by removing too much dorsal layer
- Use acid-free primer on properly prepared surface to improve adhesion
- Educate client on cuticle oil use and hydration to improve natural nail health between appointments
Frequently Asked Questions About Nail Anatomy and Product Retention
Can I change my natural nail anatomy to improve retention?
No, you cannot fundamentally change your nail anatomy—factors like flexibility, growth direction, and oil production are genetically determined. However, you can significantly improve nail health through proper hydration (cuticle oil twice daily), nutrition (biotin supplementation after consulting your GP), and protection (wearing gloves during water exposure). The professional solution is to adapt your technique and product choices to work with your unique nail anatomy rather than attempting to change it.
Why do my enhancements last longer in winter than summer?
Seasonal variation in retention is primarily due to moisture exposure and growth rate changes. In summer, increased water activities (swimming, increased hand washing due to heat) cause more frequent nail hydration cycles. Nails expand and contract more dramatically, stressing adhesion bonds. Additionally, faster nail growth in warmer months creates more leverage stress at the free edge. In winter, reduced water exposure and slower growth create more stable conditions for retention. Professional strategy: adjust your application slightly by season—thinner cuticle area application in summer to accommodate faster growth, slightly more conservative length to reduce leverage.
Does nail anatomy change with age?
Yes, nail characteristics change throughout life. Children and young adults typically have thinner, more flexible nails with faster growth rates. Middle age brings optimal nail strength and moderate growth. Older adults often develop thicker, more brittle nails with slower growth and reduced oil production. These changes require technique adjustments—younger clients need harder products and frequent appointments, whilst older clients benefit from intensive hydration protocols and gentler preparation methods. Understanding these age-related changes allows you to provide appropriate care at every life stage.
Can medication affect nail anatomy and retention?
Absolutely. Certain medications significantly impact nail structure and retention. Chemotherapy drugs can cause severe nail thinning and brittleness. Blood pressure medications may increase nail flexibility. Thyroid medications affect growth rate and strength. Retinoids (for acne or skin conditions) can cause peeling and sensitivity. Antibiotics sometimes alter nail texture. Always conduct a thorough consultation asking about medications. For clients on medications affecting nails, adjust expectations realistically, use gentler products and techniques, and prioritise nail health over aesthetics. In some cases, declining service until medication changes is the most professional approach.
Why do the same products work differently on different fingers?
Each finger has slightly different nail anatomy. Thumbs typically have the thickest, strongest nails with slowest growth. Index and middle fingers endure the most mechanical stress from typing and daily tasks. Ring and little fingers often have thinner, more flexible nails. Additionally, dominant hand nails may be slightly different from non-dominant hand due to increased use and stress. This is why experienced technicians assess and potentially adjust technique finger-by-finger rather than applying identical methods across all nails. Little fingers, for example, often benefit from slightly longer cure times and harder products due to increased flexibility.
Is it true that some people just cannot have nail enhancements?
In most cases, no. What appears to be “impossible nails” is usually a mismatch between nail anatomy and application approach. Approximately 95% of retention failures can be solved through proper anatomical assessment and technique adaptation. However, there are rare contraindications: active fungal or bacterial infections, severe psoriasis affecting the nail matrix, certain autoimmune conditions causing nail dystrophy, or extremely damaged nails from years of improper enhancement application. For these clients, nail health restoration must precede any enhancement services. Additionally, some clients have such extreme anatomical challenges (extremely oily, highly flexible, severely downward-curved nails combined) that retention expectations must be managed realistically—perhaps 2 weeks instead of 4 weeks, which may not justify the cost for the client.
How do I know if retention problems are my technique or client anatomy?
Track patterns systematically. If only specific clients experience retention issues whilst most clients achieve 3-4 weeks, the problem is likely anatomical variation requiring technique adjustment. If most or all clients experience similar retention failures, the problem is likely your preparation protocol, product choice, or application technique. Keep detailed notes: which fingers lift, when lifting occurs (days 1-7 = preparation/adhesion issue; days 14-21 = growth stress or product choice issue), where lifting begins (cuticle = oil/preparation; free edge = flex/structure; sidewalls = application coverage). This data reveals patterns that guide solutions. Professional development through advanced training helps you distinguish between the two and develop solutions for both.
Does nail biting history permanently damage nail anatomy?
Chronic nail biting can cause permanent changes to the nail matrix (the growth centre beneath the cuticle), resulting in irregular nail plates, unusual growth patterns, or persistent ridging. However, many recovered nail biters can achieve normal nail anatomy with time—typically 6-12 months of growth without biting allows the matrix to recover. For recent nail biters or those with matrix damage, nails may be thinner, more flexible, and have irregular surfaces requiring modified application techniques. Use gentle preparation methods, avoid mechanical stress during application, and manage expectations realistically. Some nail biters develop exceptionally strong, healthy nails after recovery as they become diligent about nail care to prevent relapse.
About Your Instructor: Radina Ignatova
Radina Ignatova is a Professional Nail Expert, Certified Educator, and founder of Artistic Touch – Nail Training Academy, based in Dundee, Scotland, UK.
With over a decade of professional experience in advanced nail techniques including BIAB application, Russian Manicure, e-file methods, and nail anatomy education, Radina specialises in transforming beginner nail technicians into confident professionals through structured online and in-person education.
Her teaching philosophy focuses on:
- Evidence-based anatomical understanding rather than memorised techniques
- Troubleshooting and problem-solving through anatomical assessment
- Individualised client assessment and technique adaptation
- Professional retention strategies that work in real-world salon environments
Transform Your Retention Results Through Anatomical Mastery
Understanding nail anatomy is not an optional advanced skill—it is the foundation of professional nail services. Every client who sits in your chair brings unique anatomical characteristics that determine whether your beautiful application will last 4 days or 4 weeks.
The difference between technicians who struggle with retention and those who consistently achieve exceptional results is not expensive products or secret techniques. It is anatomical understanding and the ability to adapt technique to individual nail characteristics.
What You Will Master in Our BIAB Masterclass:
- ✓ Comprehensive nail anatomy assessment protocol for every client type
- ✓ Product selection matrix based on flexibility, thickness, and curvature
- ✓ Apex placement adjustments for upward, straight, and downward growth patterns
- ✓ Preparation protocols for high-oil, dry, and damaged nail surfaces
- ✓ Real case studies demonstrating anatomy-based problem solving
- ✓ Client consultation templates for gathering anatomical information
Stop guessing why retention fails. Start understanding the anatomical reasons and implementing proven solutions.
Achieve Consistent 3-4 Week Retention
Join over 200 certified technicians who transformed their retention results through anatomical mastery
Enrol in BIAB Masterclass Now →
Lifetime access • Professional certification included • Start immediately
About Artistic Touch – Nail Training Academy: Professional online nail education delivered by Radina Ignatova from Dundee, Scotland, UK. Specialising in BIAB application, Russian Manicure, e-file techniques, and comprehensive nail anatomy education for aspiring and professional nail technicians.