Cat Eye Leopard Matte Nails: Easy Magnetic Nail Art Tutorial
I had been seeing the cat eye leopard effect all over my Instagram, so I decided to do it on a client, and it turned out beautiful. This article walks through exactly how I recreate it: a golden velvet cat eye, a hand-painted leopard print and a matte finish that keeps the shimmer underneath.
It follows the tutorial on my official YouTube channel, Radina Ignatova | Nail Academy. The leopard print is beginner friendly, and the cat eye is easy once you know why to work one finger at a time.
Quick Answer: How Do You Make Cat Eye Leopard Matte Nails?
Apply one coat of a shimmery brown one-step colour and cure it. Mix cat eye magnetic powder with top coat, paint one nail at a time and use a magnet to pull the particles towards the centre in a velvet pattern, then cure that nail before moving on. Hand-paint black leopard spots with gel polish, pressing harder for thicker lines and easing off for thinner ends. Finish with a matte gel top coat, which keeps the magnetic shimmer visible underneath at a different level of depth.
Watch the Video: Cat Eye Leopard Matte Nails Tutorial
The tutorial shows every step on a client. These are the parts I would watch first:
- The shimmery brown base colour (0:07)
- Applying the cat eye and the velvet pattern (1:03)
- Why I work one finger at a time (2:08)
- Hand-painting the leopard print (3:56)
- The matte top coat and the finished nails (5:56)
What You Need
- A shimmery brown one-step gel colour for the base.
- Cat eye magnetic powder, mixed with top coat on a palette.
- A magnet for the velvet pattern.
- A small detail brush for picking up the cat eye mixture and for the leopard spots.
- Black gel polish for the leopard print.
- A matte gel top coat.
- A lamp, or a small flash lamp to cure each nail as you go.
Underneath, the client already had a BIAB overlay done with dual forms, which gives a perfectly smooth surface for the cat eye to sit on. If you want to learn how that is done, it is covered in The Ultimate Dual Forms, and you can also see more on my YouTube channel.
Step 1: The Shimmery Brown Base
I start with a base colour. In this case I use a brown, sparkly one-step colour, and I only need one coat. I chose a brown shimmery colour because it gives the finished nails even more depth. I paint all ten fingers and cure them.
Step 2: Create the Golden Velvet Cat Eye
The cat eye is a powder mixed with top coat. I mix it on a palette on my right-hand side, pick up a little with a small detail brush, and paint the nail all over, leaving as few streaks as possible.
Then I use a magnet to create the velvet pattern. I pull the magnetic particles inwards, towards the middle of the nail, with a couple of swipes from the right and then from the left side of the nail. It is very easy, and it is my favourite pattern. Then I polymerise.
| Step | What to do |
|---|---|
| 1 | Mix the cat eye powder with top coat on a palette |
| 2 | Pick up a little with a small detail brush and paint one nail all over, with as few streaks as possible |
| 3 | Use the magnet to pull the particles towards the centre: a couple of swipes from the right, then from the left |
| 4 | Cure or flash cure that nail before moving to the next one |
Why I Work One Finger at a Time
If you leave the particles too long after you have magnetised them, they lose the effect. That is why I work one finger at a time and send each one to polymerise, or even flash cure, under the lamp.
Curing each nail straight away also means the magnetic particles do not move when I go on to work on the other fingers. Once they are cured, you can see how shiny and pretty they already look, and when they pick up the light, they are amazing.
Step 3: Hand-Paint the Leopard Print
I put a little black gel polish on a palette and hand paint the leopard pattern. It is very easy and beginner friendly. The technique is pressure: the more pressure you use on the brush, the thicker the line, and the less pressure you use, the thinner the line.
I make little half-moon lines. Where I want a line to be thicker, I press, and I let go of the pressure at the end of some of them so the ends become slightly thinner. That gives you more precise, thinner ends without any complicated technique. Repeat the same on all ten fingers. It is very quick for a nail art design, and it is very trending right now.
Step 4: Matte Top Coat
The beauty of this cat eye leopard effect is that we mattify it with a matte gel top coat. The matte cat eye still shines underneath, but at a different level, which gives the nails slightly more depth. My client and I both loved how they turned out.
After curing, I remove the inhibition layer. The finished effect looks shiny and beautiful with no flash, and with flash on you can see how the magnetic reflection changes in different lighting.
The Finished Cat Eye Leopard Nails
This is the finished set. The golden velvet cat eye is still visible and still catches the light under the matte top coat, and the hand-painted black leopard spots sit on top of it.
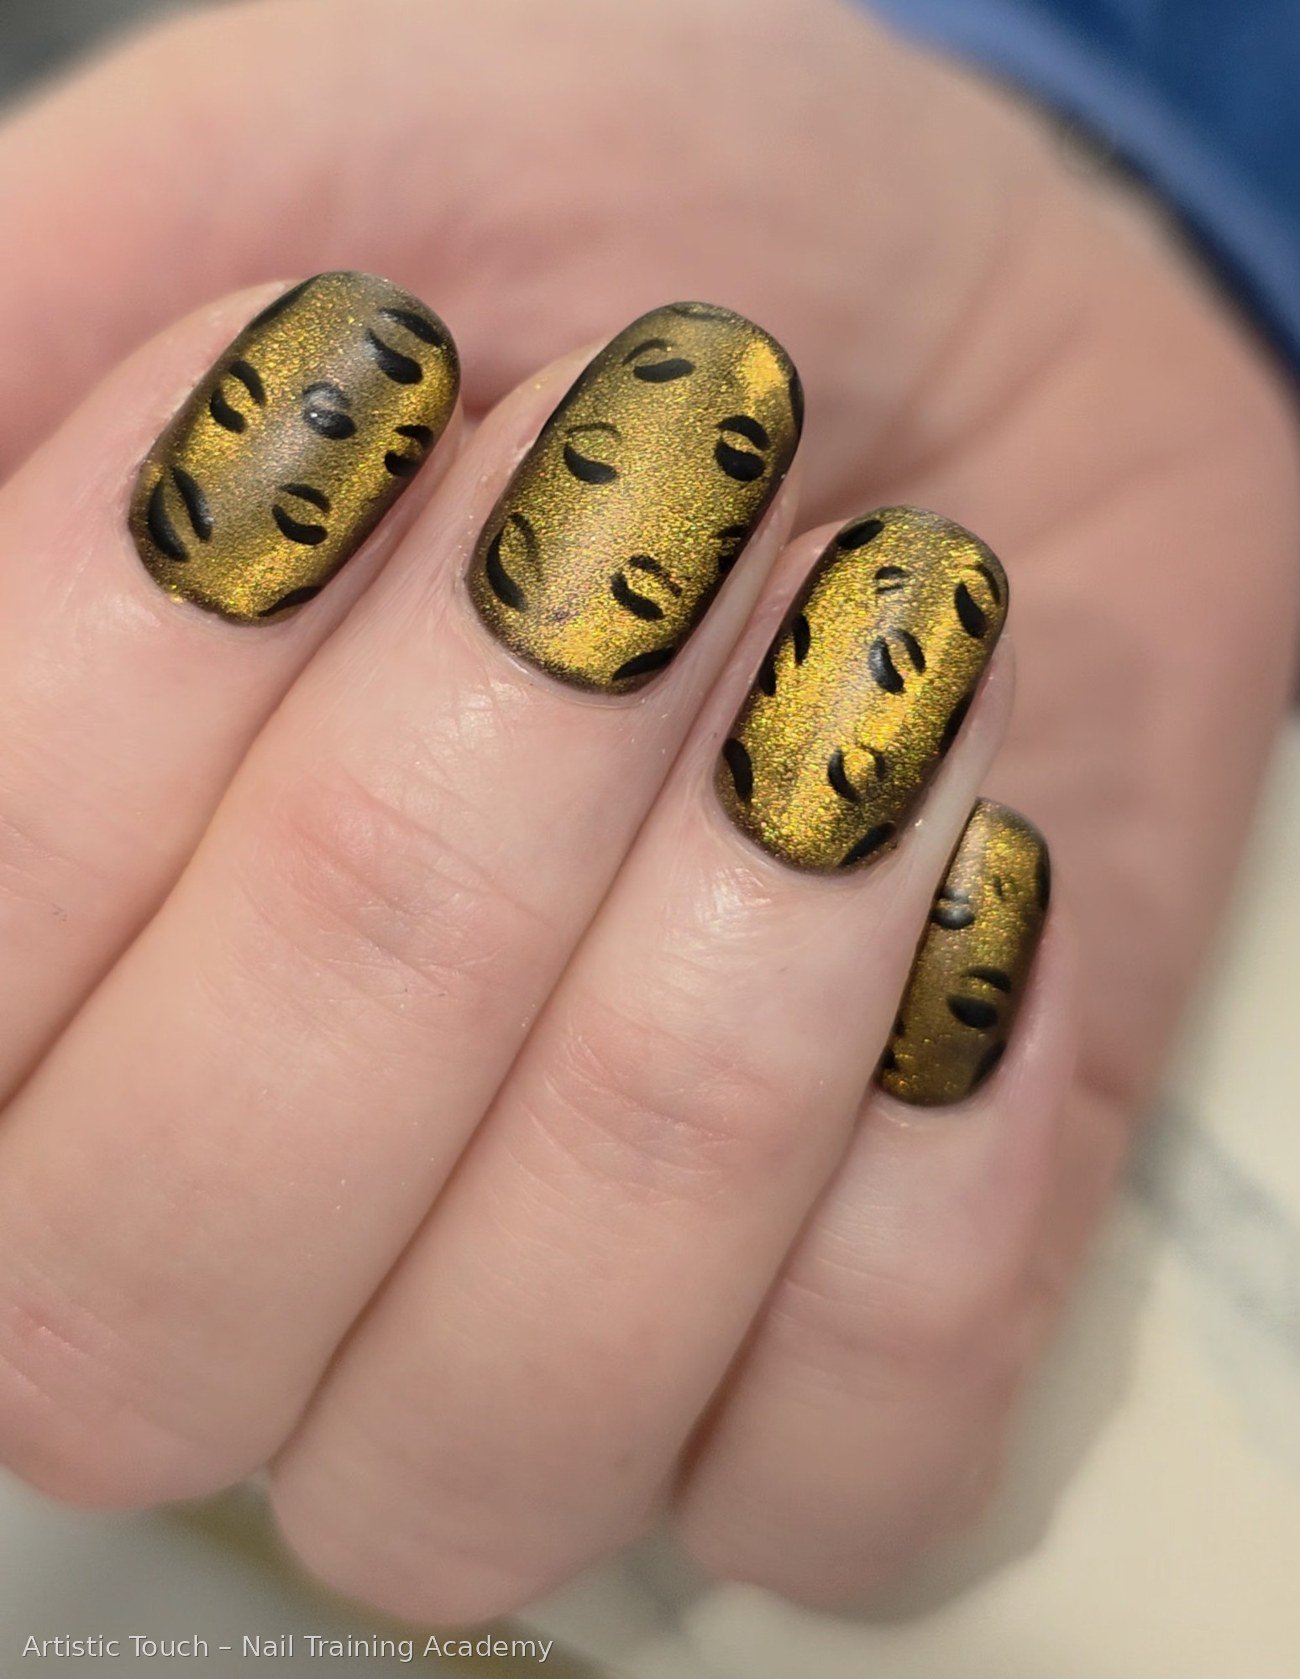
The matte cat eye still shines underneath, but at a different level, which gives the nails slightly more depth. In the video you can also see the finished nails with and without flash, so you can see how the magnetic reflection changes in different lighting.
Tips for a Cleaner Result
- Start with a smooth surface. A BIAB overlay with dual forms gives the cat eye a flat base to sit on.
- Choose a shimmery colour for the base, which adds depth to the cat eye.
- Work one finger at a time, so the particles do not lose the effect.
- Cure each nail straight away, so the magnetic particles do not move.
- Paint the cat eye mixture on evenly, leaving as few streaks as possible.
- Control the leopard lines with pressure: press for thick, ease off for thin ends.
- Use a matte gel top coat to add depth without losing the shimmer.
- Keep an eye on bulk. A cat eye can add thickness depending on how it is done.
For more on why cat eye finishes can add bulk and why simple surfaces demand good technique, read why plain nails demand better technique. For what clients are asking for this season, read autumn nail trends 2026. If you like using colour inside the form, see the dual form colour technique.
To build the smooth, thin overlays that make nail art like this look premium, explore The Ultimate Dual Forms and all online nail courses.
Build the Smooth Base That Makes Nail Art Look Premium
Learn dual form overlays, extensions, shaping and the business side in The Ultimate Dual Forms.
View the Course Details →Frequently Asked Questions
How do you make cat eye leopard nails?
Apply a shimmery brown base, paint one nail with cat eye powder mixed with top coat, pull the particles to the centre with a magnet for a velvet pattern, cure, hand-paint black leopard spots, and finish with a matte gel top coat.
What is the velvet cat eye pattern?
It is a magnetic pattern created by pulling the particles inwards towards the middle of the nail with a couple of swipes of the magnet from the right and then from the left.
Why do you work one finger at a time with cat eye?
If the magnetised particles are left too long they lose the effect. Working one finger at a time and curing each one also keeps the particles from moving while you work on the other fingers.
How do you paint a leopard print on nails?
Use black gel polish and a fine detail brush to make little half-moon lines. Press harder for thicker lines and ease off the pressure for thinner ends. It is beginner friendly.
Does a matte top coat ruin the cat eye effect?
No. The matte cat eye still shines underneath, but at a different level, which adds depth.
What base colour works best under cat eye?
I used a shimmery brown one-step colour, with one coat, because it adds more depth to the finished nails.
Where can I watch the full tutorial?
‘Cat Eye Leopard Matte Nails Tutorial | Easy Magnetic Nail Art’ is on Radina Ignatova | Nail Academy, the official YouTube channel of Artistic Touch – Nail Training Academy. It is embedded at the top of this article.
Key Takeaway
The cat eye leopard effect is easy when you work one finger at a time, cure each nail before the magnetic particles can lose their effect, control the leopard lines with brush pressure, and finish with a matte top coat that keeps the shimmer underneath.
Learn the Smooth Base Behind Premium Nail Art
The Ultimate Dual Forms teaches overlays, extensions and shaping, so your nail art sits on a smooth, thin, well-structured nail.
View The Ultimate Dual Forms →About the Author
Professional Nail Expert | International Nail Educator
I am Radina Ignatova, a Professional Nail Expert since 2014 and International Nail Educator, based in Scotland, UK. I am the Founder of Artistic Touch – Nail Training Academy and TheNailWiki.
At Artistic Touch – Nail Training Academy, I provide structured professional online nail education specialising in dual forms, nail preparation and retention, nail structure, E-File work and Russian Manicure, with a strong focus on professional salon safety. I continue to work actively in salon practice, ensuring that all education reflects real client scenarios and current industry standards.
My teaching philosophy is simple: I show real salon challenges, real mistakes and real performance testing, not just perfect demonstrations. This is how you develop genuine technical competence and become a confident, capable nail professional.