7 Sandwich Dual Forms Mistakes You Can Spot Instantly (Before They Break)
Quick Answer: What Are the Most Common Sandwich Dual Forms Mistakes?
The seven most common mistakes are bulky thick nails from incorrect form selection, crooked or misplaced apex, flat C-curve with structural weak spots, uneven sidewalls, hollow centre visible from side profile, growth points not properly closed, and underside ledges where product has not bonded smoothly.
These mistakes are visible immediately after application — before the client leaves and before the enhancement breaks — if you know what to look for and which angles reveal structural problems.
Why Most People Do Not Know What Is Wrong With Their Sandwich Dual Forms Nails
Most nail technicians know something is wrong when their sandwich dual forms nails break after a few days, lift at the sidewalls, or pop off at the cuticle area. What they do not know is what caused the failure — because they are looking at the finished result from the wrong angle.
They watch tutorials showing perfect nails from the top view. They copy the steps exactly. The nail looks acceptable immediately after application. Then it fails within a week, and they assume the problem was in their technique — their product control, their curing time, or their filing approach.
The problem is not technique. The problem is structural — and it was visible immediately after the forms were removed, if they had known which angles reveal the mistakes that cause service breakdown.
Mistake 1: Nails Look Bulky and Thick
Bulky, thick nails are the most visible sign that form selection was incorrect. This happens when you select a form with a deeper C-curve arch than the natural nail can accommodate.
The sandwich system compresses product between two forms. When the top form has a deep arch and the natural nail is relatively flat, the compression forces excessive volume into the centre of the nail. This creates thickness that looks acceptable from the top view but appears bulky and unnatural when viewed from the side.
You cannot file away this thickness without compromising structural integrity. The bulk is locked into the enhancement during compression. The only way to prevent it is to select forms by C-curve depth — not width — before any product is placed.
When nails look bulky, the mistake was made before the product was opened. This is a selection error, not an application error.
Mistake 2: Apex Looks Crooked or Sits in the Wrong Place
A crooked apex — one that runs at an angle instead of centrally, or sits too far forward or too close to the cuticle — indicates the forms shifted during application or were not aligned correctly before product was placed.
The apex is the highest point of the nail’s curve. It should run centrally when viewed from above and create a smooth profile when viewed from the side. When the apex is crooked, it creates uneven stress distribution across the enhancement, which increases breakage risk and reduces wear time.
An apex that sits too close to the cuticle creates a weak zone where lifting begins. An apex that sits too far forward creates excessive length stress and makes the nail more prone to breaking at the smile line.
Apex placement is controlled by form alignment and product distribution. When the apex looks wrong, it means the forms were not positioned correctly or the product was not placed with enough control to maintain central alignment during compression.
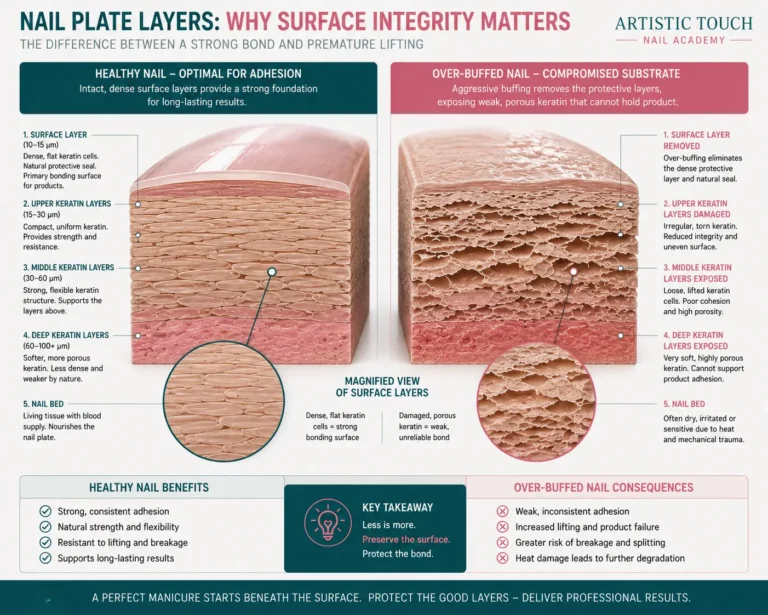
Mistake 3: C-Curve Looks Flat With Weak Spots
A flat C-curve — one that shows little to no curve when viewed from the free edge, or has flat spots in the centre whilst the sidewalls curve normally — is a structural failure that compromises the entire enhancement.
The C-curve provides structural strength. When the curve is flat, stress concentrates in the flat zones instead of distributing evenly across the arch. This creates weak points where cracks begin and where the enhancement is most likely to break under normal wear.
Flat C-curves happen when the form selection does not provide enough arch to create proper compression, or when the bottom form does not support the centre zone during curing. The product settles flat because there is no structural support holding the curve.
You can identify a flat C-curve immediately after removing the forms by looking at the nail from the free edge view. If the curve is minimal or irregular, the structure is weak — regardless of how the nail looks from the top.
Mistake 4: Sidewalls Are Uneven in Thickness
Uneven sidewalls — where one side of the nail is noticeably thicker than the other, or where you can see ridges running along the sidewall zones — indicate poor form fit or the forms shifting during product placement.
When forms do not seat evenly on both sides of the nail, compression is uneven. One side receives more pressure than the other, which forces product into areas where it should not accumulate. This creates thickness on one sidewall whilst the other remains relatively thin.
Uneven sidewalls also indicate incomplete growth point closure. When the form is too narrow at the sidewall zones, growth points remain open. Product leaks into these gaps, creating ridges and thickness that are visible from both the top and side views.
This is not a refinement issue. You cannot file away uneven sidewalls without thinning one side excessively. The solution is proper form selection and alignment before compression begins.
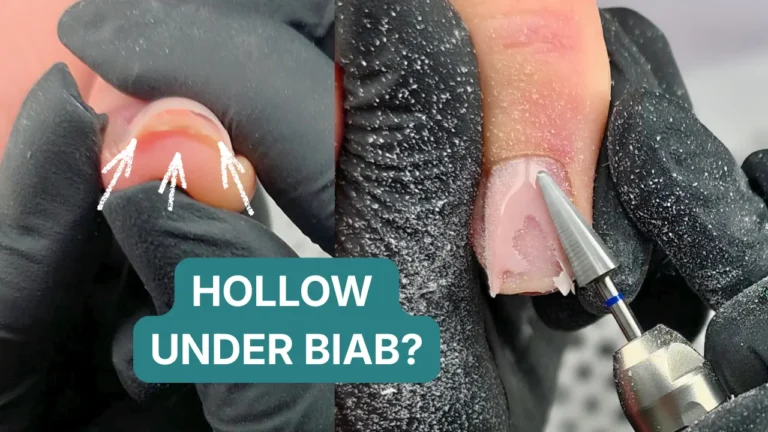
Mistake 5: Hollow Centre Visible From Side Profile
A hollow centre is a concave dip in the nail’s profile when viewed from the side. It looks like the centre of the nail has collapsed inward, creating a valley between the cuticle area and the apex.
This happens when product is not distributed evenly during compression, when the bottom form does not support the centre zone, or when forms are removed too early before the product has fully set. The result is a weak zone where the enhancement has insufficient structural support.
Hollow centres are not always visible from the top view. The nail might look acceptable from above, but when you turn it sideways, the profile shows the dip immediately. This is why checking the side profile after removing the forms is essential — it reveals structural failures that the top view hides.
Nails with hollow centres break easily at the weak zone. Clients often report that the enhancement snapped in half or developed a crack running horizontally across the nail. The failure point is always at the hollow area where structural integrity was compromised during application.
Mistake 6: Growth Points Are Not Properly Closed
Growth points are the side corners where the dual form meets the natural nail at the sidewalls. When a form is too narrow or does not fit the nail shape correctly, these points do not close fully.
Unclosed growth points leave gaps where product leaks during compression. This creates weak spots at the sidewall zones — exactly where stress concentrates during normal hand movement. The result is lifting, cracking, or complete sidewall separation within days of application.
You can identify unclosed growth points by looking at the sidewall zones immediately after removing the forms. If you see small gaps, ridges, or areas where the product appears thinner than the rest of the nail, the growth points were not closed properly.
Proper growth point closure requires selecting forms that match the nail width at the sidewall zones and positioning them so the edges seal completely against the natural nail before product is placed. This is a form selection and placement issue, not something that can be fixed during refinement.
Mistake 7: Underside Ledges Where Product Has Not Bonded Smoothly
The underside of a sandwich dual forms nail should be smooth and even, with no visible ridges, ledges or steps where the bottom form sat during compression.
When you see ledges or ridges on the underside, it means the bottom form was not placed correctly, the product leaked beyond the form edges, or layers of product did not bond properly during curing.
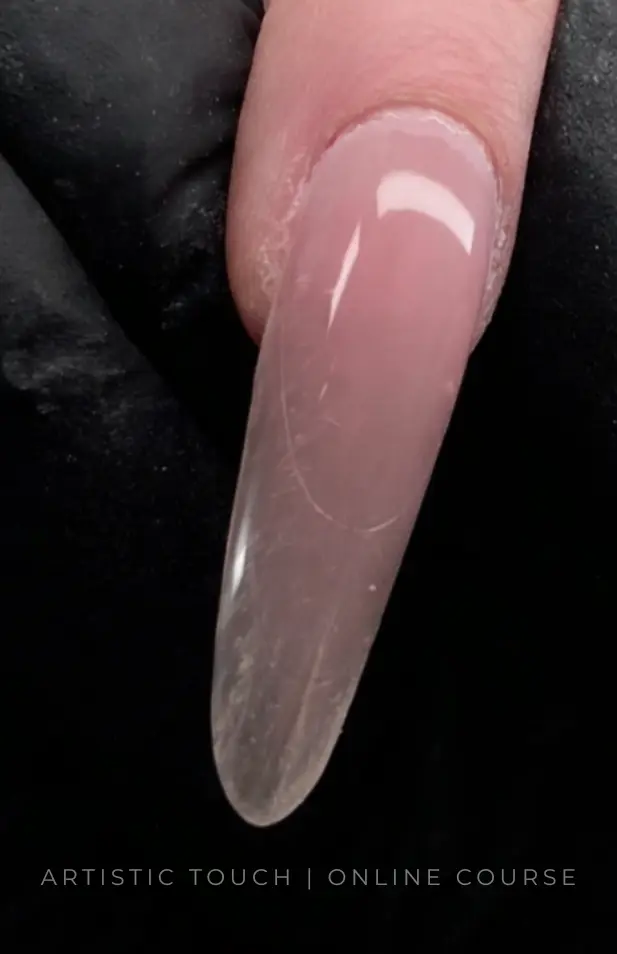
Correct structure from every angle — top, side, and underside all show smooth, even results without ledges or weak zones.
Underside ledges create discomfort for the client. The rough edge catches on clothing and feels uneven when they touch the nail. It also indicates poor product control — the bottom form was flooded with gel, or product was not confined properly within the compression zone.
This mistake is visible immediately when you check the underside after removing the forms. If you see ridges, steps or rough edges, the bottom form placement was incorrect or product control was not maintained during application.
Recognising Mistakes Is Only the First Step
Knowing what went wrong is valuable. Understanding why it went wrong — and how to prevent it through correct form selection, growth point control, and placement technique — is what creates consistent professional results.
If you want to stop making these mistakes and start understanding the structural decisions that prevent them, the Sandwich Dual Forms course shows you the full system — with troubleshooting integrated into real-time demonstrations so you see exactly when and why failures happen.
Why These Mistakes Keep Happening
These seven mistakes are not caused by poor application skills. They are caused by a lack of understanding about what the sandwich system does structurally and how form selection controls the final result.
When you select forms by width alone — without assessing C-curve depth, natural nail architecture, or volume capacity — you introduce structural problems before any product is opened. The compression system cannot correct a form that does not match the nail type. It can only compress the product within the space the forms create.
Tutorials that show perfect results without explaining the selection logic behind them encourage copying without understanding. You follow the steps exactly, but you do not know which nail types are suitable for the forms being used, which structural factors determine success, or what to look for when something goes wrong.
This is why the same mistake happens repeatedly — bulky nails, crooked apexes, hollow centres, unclosed growth points. The mistake is not in your hands. The mistake is in the decision-making process before application begins.
What Correct Results Tell You About the Process
When you see a sandwich dual forms nail with none of these mistakes — smooth even structure, balanced apex, consistent C-curve, closed growth points, clean underside finish — you are seeing evidence that the system worked as intended.
The forms were selected correctly for the nail type. The placement was controlled. The compression created the intended structure. Every decision made before and during application supported the final result.
Professional sandwich dual forms work is built on understanding these decisions. It is not about copying what a finished nail looks like. It is about understanding what the system does to volume and structure, and making selection and placement choices that match the nail anatomy you are working with.
Frequently Asked Questions
Can I fix these mistakes after the forms are removed?
Most of these mistakes cannot be fully corrected after curing because they are structural problems locked in during compression. You can refine the surface and adjust minor shape issues, but core problems like hollow centres, incorrect apex placement, or uneven C-curves require complete removal and reapplication with correct form selection.
How do I know if my form selection is causing the bulkiness?
Check the side profile immediately after removing the forms. If the nail looks excessively thick from the side whilst appearing acceptable from the top, your form has a deeper C-curve arch than the natural nail can accommodate. The solution is selecting forms by matching C-curve depth to the natural nail architecture, not by width alone.
What should I look for to check growth point closure?
Look at the sidewall zones immediately after removing the forms. Growth points should show no gaps, ridges, or thin spots. The product should extend smoothly to the edge of the natural nail at both sidewalls. If you see gaps or uneven thickness at the corners, the form was too narrow or not positioned correctly.
Why does the apex keep ending up crooked even when I am careful?
A crooked apex typically indicates the forms shifted during product placement or curing. This happens when forms are not secured properly, when too much product is used creating movement during compression, or when the bottom form does not support the structure evenly. Form alignment and product control prevent this.
How can I tell if there is a hollow centre before the nail breaks?
Check the side profile immediately after removing the forms. A hollow centre appears as a concave dip in the nail’s curve when viewed from the side. If the profile does not show a smooth gradual arch from cuticle to apex to free edge, the centre has insufficient structural support and will likely break at that weak zone.
Are underside ledges normal with sandwich dual forms?
No. The underside should be smooth and even with no visible ledges, ridges or steps. Ledges indicate the bottom form was flooded with product, positioned incorrectly, or that product leaked beyond the form edges during compression. Correct bottom form placement and product control prevent this.
Stop Making the Same Mistakes — Learn the Full System
Master sandwich dual forms correctly with form selection by C-curve depth, growth point control, troubleshooting integrated into real-time demonstrations, and 3 downloadable PDF guides. Lifetime access, private student support group with expert feedback from Radina, and certificate of completion included.
Sandwich Dual Forms Course — £97 →Lifetime access • Private student community • Direct access to Radina • Start immediately
About the Author

Radina Ignatova
Professional Nail Expert | International Nail Educator
I am Radina Ignatova, a Professional Nail Expert since 2014 and International Nail Educator, based in Scotland, UK. I am the Founder of Artistic Touch Nail Training Academy and TheNailWiki.
At Artistic Touch Nail Training Academy, I provide structured professional online nail courses specialising in dual forms, gel systems, polygel application, advanced nail structure, E-File work and Russian Manicure, with a strong focus on professional salon safety. I continue to work actively in salon practice, ensuring that all education reflects real client scenarios and current industry standards.
My teaching philosophy is simple: I show real salon challenges, real mistakes and real performance testing, not just perfect demonstrations. This is how you develop genuine technical competence and become a confident, capable nail professional.
Every Artistic Touch course includes lifetime access and access to a dedicated student support group, where I provide ongoing guidance and professional feedback.
Disclaimer: This content is for educational purposes only. Nail services should be performed by trained professionals following current hygiene and safety regulations. Always carry out a full client consultation and check for contraindications before performing any nail service.
About Artistic Touch Nail Training Academy
Artistic Touch Nail Training Academy delivers structured professional online nail education focused on practical skill development, professional standards and safe salon practice. All courses are available online worldwide.