Sandwich Dual Forms Tutorial: Mistakes, Corrections & Complete Guide
Quick Answer: How Do You Apply Sandwich Dual Forms Correctly?
Sandwich dual forms require pressing the entire form at once whilst curing fully, not flash curing like regular dual forms. The most common mistakes include putting thick decorations inside the form, forcing the bottom part onto hooked nails, and flash curing sections instead of pressing everything simultaneously.
Key differences from regular dual forms: Press both parts together (not cuticle first), cure completely (no flash cure), and assess natural nail shape before choosing whether to use the bottom form.
Master this properly: This comprehensive guide shows you the mistakes I made testing sandwich dual forms for the first time, followed by the corrected technique that achieved professional results. Watch all three video tutorials below for complete understanding.
Why Sandwich Dual Forms Are Different (And Why Most People Get Them Wrong)
When I tested sandwich dual forms for the first time, I made every mistake possible. Gaps at the sidewalls, holes in the structure, lifting at the cuticle, and poor product placement. The nails looked bulky, felt weak, and would have broken immediately under normal use.
The problem was simple: I treated sandwich dual forms like regular dual forms. I flash cured the cuticle area first, I forced the bottom part onto hooked nails, and I put decorations inside the form without thinking about structure. Each of these mistakes created problems that showed up immediately in the finished nails.
Sandwich dual forms work completely differently than regular dual forms, and this difference is not obvious until you see the mistakes firsthand.
In this comprehensive guide, I will show you exactly what went wrong in Part 1, how I corrected every mistake in Part 2, and how to create beautiful 3D snowflake designs using the proper technique. You will see the honest mistakes, the corrections, and the professional results—nothing hidden, everything explained.
Part 1: The Five Critical Mistakes I Made
After analysing my first attempt with sandwich dual forms, I identified five major mistakes that caused structural problems, gaps, and poor retention. Each mistake seemed minor at the time, but together they created nails that would not have lasted more than a few days.
Mistake 1: Placing Thick Decorations Inside the Dual Form
The first and most obvious mistake was putting gems and rhinestones inside the dual form before applying the polygel. Whilst this seemed like a clever way to embed decorations, it created serious structural problems.
⚠️ Why This Creates Problems
When thick decorations occupy space inside the form, there is not enough room for the polygel to reach the sidewalls and stress points. This creates gaps, weak structure, and potential lifting. The nail has no strength where it needs it most—at the sides and free edge.
What I observed: Massive gaps at the sidewalls, insufficient product coverage, and visible air pockets where the gems prevented proper product distribution. The structural integrity was completely compromised.
Mistake 2: Flash Curing Like Regular Dual Forms
This was the biggest technical mistake. With regular dual forms, you flash cure the cuticle area first, then press the rest of the form and cure fully. I assumed sandwich dual forms worked the same way. They do not.
What went wrong: Flash curing parts of the sandwich form created uneven pressure distribution. When I tried to press the form fully after flash curing one section, the product had already partially set, preventing proper seal formation. This caused gaps, holes, and lifting at multiple points.
The Correct Method
Sandwich dual forms require pressing the ENTIRE form down at once—top and bottom simultaneously—whilst maintaining pressure and curing completely for 60 seconds. No flash cure, no sections, just press everything and cure fully.
Mistake 3: Forcing the Bottom Form on Hooked Nails
Not all natural nails are flat or upward-growing. Some nails grow downwards (hooked nails), and forcing a flat dual form bottom onto this natural curve creates structural problems and an unnatural appearance.
What happened: On my hooked nail (the nail that curves downward), I tried to use both parts of the sandwich form. The bottom part did not follow the natural nail curve, creating a gap underneath and making the nail sit too high. The result looked bulky and would not have worn comfortably.
The solution: For hooked or downward-growing nails, skip the bottom form entirely. Use only the top part of the sandwich form and file the underneath to match the natural nail curve. This maintains proper structure whilst following the nail’s natural shape.
Mistake 4: Poor Product Placement
I had two product placement problems: flooding at the cuticle and insufficient product at the sidewalls. Both stemmed from not spreading the product to the edges of the form before applying it to the nail.
- Flooding at cuticle: Too much product placed centrally ran towards the cuticle when pressed, creating bulk and potential skin contact
- Gaps at sidewalls: Not enough product reaching the edges meant no structural support where the nail needs it most
- Uneven distribution: Product concentrated in the wrong areas, leaving stress points vulnerable
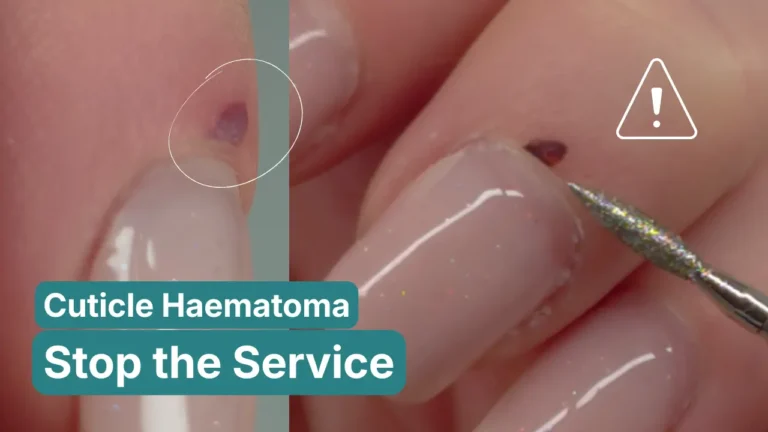
Mistake 5: Not Checking the Seal Before Curing
The final mistake was assuming the seal was correct without checking. I pressed the form onto the nail and cured immediately, without looking from different angles to verify proper contact.
The three-point check that would have prevented this:
- Side view check: Is the form flush with the cuticle? Is there a visible gap?
- Sidewall check: Press and feel along both sides. Is there contact all the way?
- Underneath view: Look under the nail. Can you see any gaps or air bubbles?
Important: The underneath view is the most critical check. If you can see gaps when looking under the nail before curing, you will definitely have lifting after curing. Check first, cure second.
Want to Master Dual Forms and Advanced Techniques?
Learning proper technique prevents these costly mistakes. My courses teach you the correct methods from the start, with detailed explanations of what works and what does not.
Part 2: The Corrected Technique (All Mistakes Fixed)
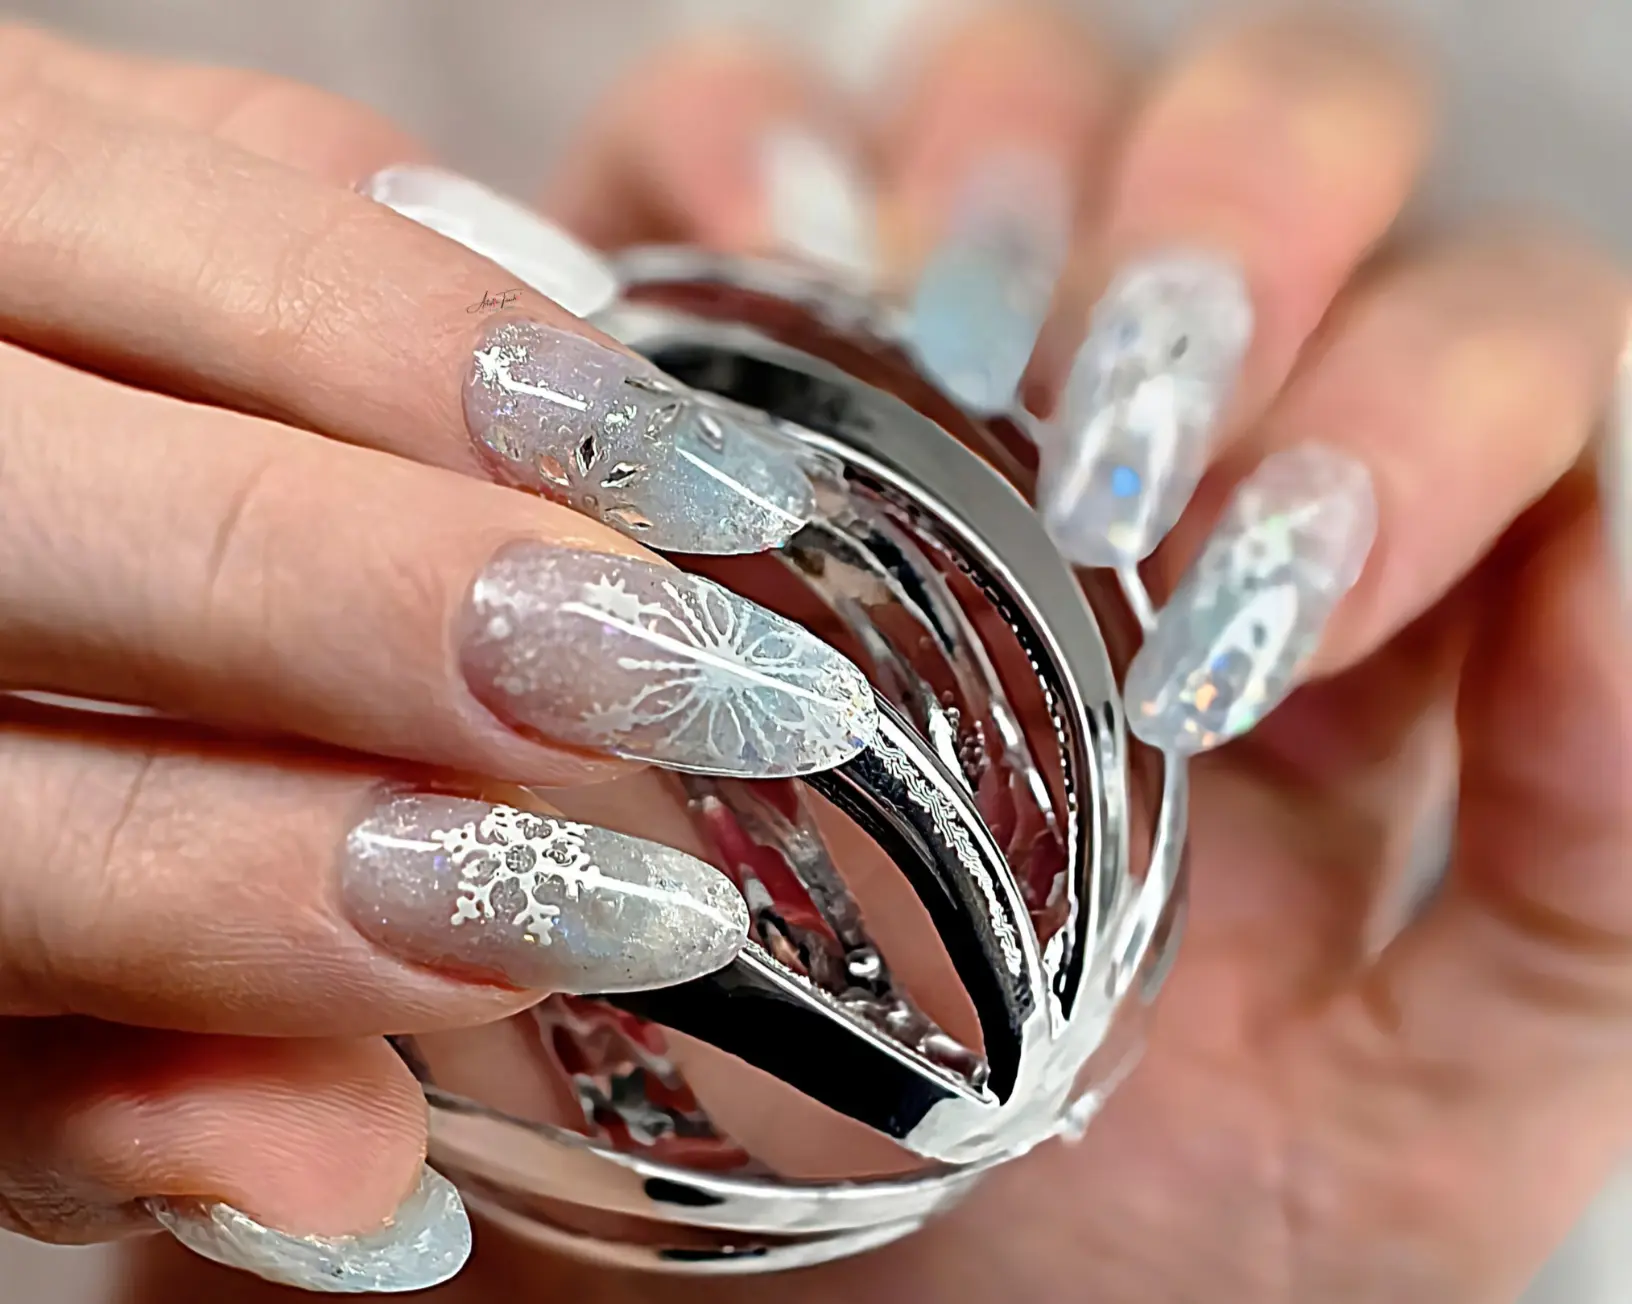
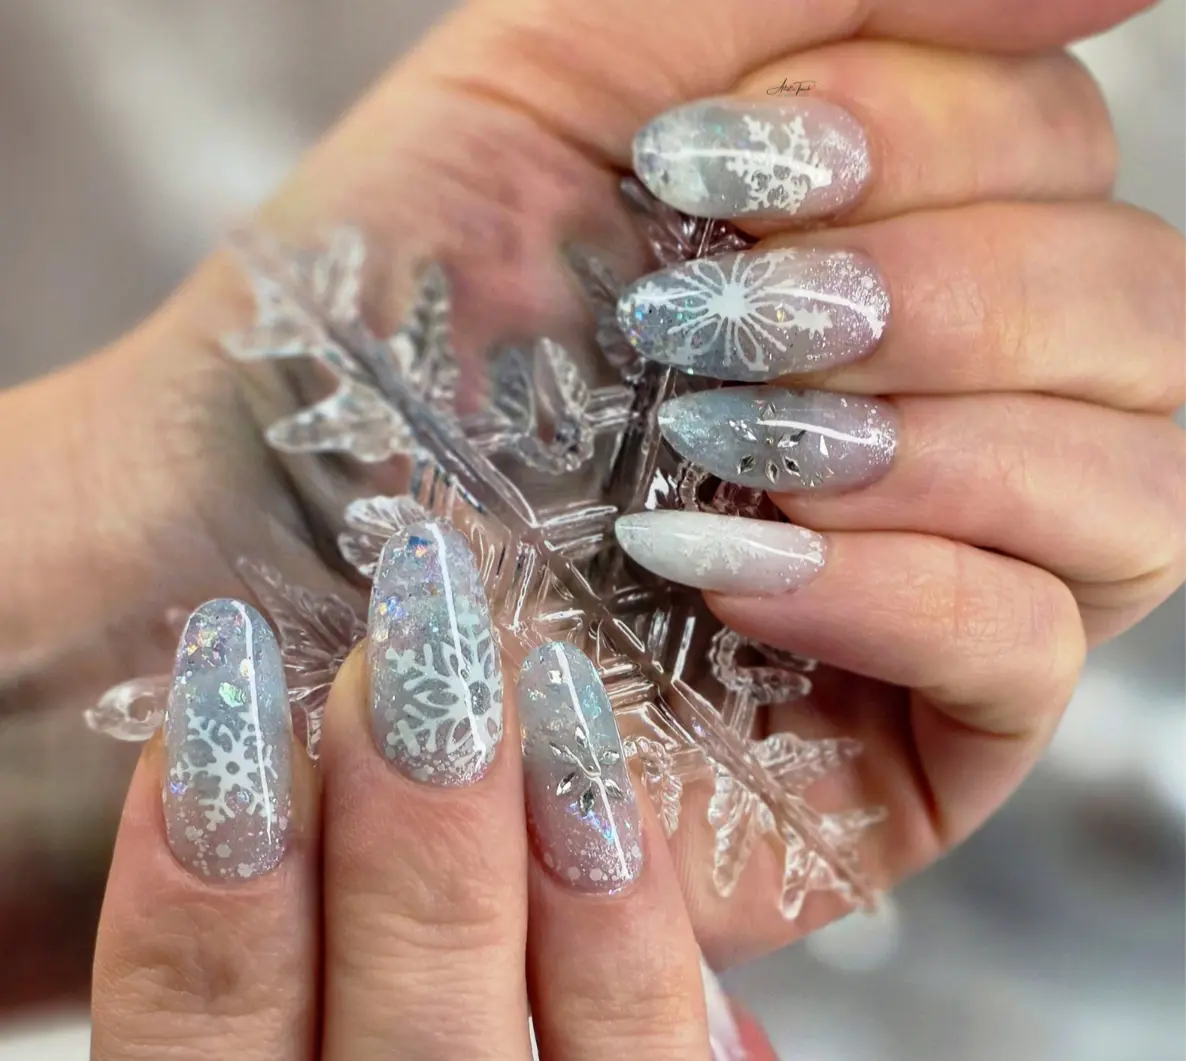
After identifying every mistake from Part 1, I filmed a corrected version applying all the solutions. The difference was dramatic—professional structure, no gaps, proper strength, and a beautiful frosty snowflake design that actually showcased the technique properly.
Correction 1: Structure First, Decoration Second
In the corrected version, I used only flat 3D snowflakes inside the dual form—no thick gems, no rhinestones that would take up product space. The snowflakes were created separately using builder gel in silicone moulds and flash cured onto the inside of the form with top coat.
The principle: Any decoration inside the form must be flat enough that it does not prevent the polygel from reaching the sidewalls and creating proper structure. If you want dimensional decorations, add them on top of the nail after the structure is secure.
Correction 2: Press Everything and Cure Fully
This was the most important correction. Instead of flash curing the cuticle area first, I applied the product, pressed the entire sandwich form down at once, held the pressure, and cured for the full 60 seconds without releasing.
Step-by-Step Pressing Technique
- Place polygel inside the top part of the dual form
- If using the bottom form, apply base coat to it (see Correction 5)
- Position the top form onto the nail
- Press from cuticle towards free edge, applying even pressure to the entire form
- Hold this pressure whilst curing for 60 seconds
- Do not release pressure during curing
- Check the seal from all angles after curing
The result: No gaps, complete seal, proper structure. The product reached every part of the form because it was not partially cured whilst being positioned.
Correction 3: Assess Nail Shape Before Choosing Forms
Before starting the application, I looked at each natural nail from the side view to determine its growth pattern. This simple assessment prevented the structural problems I encountered in Part 1.
For my hooked nail: I used only the top part of the sandwich form and later filed the underneath to match the natural downward curve. This created proper structure whilst following the nail’s natural growth pattern.
Correction 4: Spread Product to Edges First
Before pressing the form onto the nail, I used a spatula to spread the polygel all the way to the edges of the dual form. This ensured complete coverage of the sidewalls and stress points without flooding the cuticle area.
- Less product overall: Used a smaller bead than in Part 1
- Better distribution: Spread to edges before application
- Sidewall priority: Ensured product reached the sides first, then centre
- No flooding: Controlled placement prevented cuticle overflow
The result: Complete structural coverage with no gaps at the sidewalls—the areas that provide actual strength to the nail extension.
Correction 5: Safe Base Coat Application Method
For the bottom part of the sandwich form, I do not allow the product to touch the skin. Instead, I applied a thin layer of flexible base coat to the bottom form itself, then flash cured it before pressing the form onto the nail.
This method:
- Creates a secure seal without skin contact
- Allows the form to stay in position during application
- Provides proper adhesion without safety concerns
- Works well for my technique preference (others may have different approaches)
Important: This is my preferred method. Some nail technicians do allow product near the skin. Use the method that works safely within your training and comfort level. The key principle is creating a secure seal, however you achieve that.
Creating 3D Snowflakes for Nail Art
The frosty snowflake design in Part 2 used 3D snowflakes that I created separately using builder gel and silicone moulds. This technique allows you to make dimensional decorations that are flat enough to use inside dual forms without compromising structure.
Materials Needed for 3D Snowflakes
- 3D snowflake silicone mould
- White builder gel (other products do not work as well—builder gel is essential)
- Plastic spatula for removing excess gel
- Lint-free pads (must be dry)
- Detail brush for filling gaps
- UV/LED lamp
Step-by-Step Snowflake Creation
- Fill the mould: Overfill each snowflake cavity with white builder gel
- Remove excess: Use a plastic spatula to scrape off all excess gel from the flat surface of the mould
- Clean the surface: Wipe the flat surface with a dry lint-free pad until completely clean
- Fill any gaps: If you see any empty spots in the snowflake details, use a detail brush to add tiny amounts of gel
- Final clean: Wipe the flat surface again to ensure no gel remains where it should not be
- Cure fully: Place in UV/LED lamp for 60 seconds
- Remove carefully: Gently flex the mould and pop out your snowflakes
Pro Tips for Perfect Snowflakes
- Use DRY lint-free pads only—wet pads will not clean the surface properly
- Clean your moulds with prep solution or IPA between uses to maintain detail
- Remove ALL excess from the flat surface—any remaining gel will make the snowflakes too thick
- Builder gel works best because it is self-levelling and fills the mould details completely
- Make extras—you will use them for multiple nail sets
Using Snowflakes in Sandwich Dual Forms
Once your snowflakes are cured and removed from the mould, you can place them inside sandwich dual forms using this method:
- Apply wet top coat: Put a small amount of top coat inside the dual form where you want the snowflake
- Position snowflake: Place the snowflake onto the wet top coat
- Flash cure: Cure for just 5-10 seconds to secure the position (keep the rest of the form away from the lamp to avoid curing other products)
- Add polygel: Now you can add your polygel around and behind the snowflake
- Apply to nail: Follow the corrected pressing technique from Part 2
Learn Advanced Nail Techniques Properly
My courses teach you professional techniques with detailed explanations of what works, what does not, and why. You will learn proper methods that prevent common mistakes and create results that last.
Products and Materials Used
For the corrected sandwich dual forms application in Part 2, I used the following products. Note that specific brands are shown for reference, but similar products from other professional brands will work equally well.
Structure Products
- Sandwich dual forms
- Polygel
- Flexible base coat
- Top coat
Design Elements
- 3D snowflakes: Created with white builder gel in silicone moulds
- Chrome powders: Two shades mixed with polygel for ombre effect
- Chameleon flakes: Glittery chameleon flakes
- CND pigment:
- Gel polish: Shimmer and white snowy glitter
- Rhinestones (for ring finger accent nail)
Tools and Prep
- Carbide cone drill bit for refining
- 180 grit nail file
- Buffer
- Prep solution or IPA
- Dehydrator
- pH dehydrator
- Cuticle oil
⚠️ Critical Product Safety Warning
Do not put too much pigment, chrome powder, or gel polish into polygel. Changing the chemistry too much can prevent proper curing, weaken the structure, and potentially cause allergic reactions. Use small amounts only, and always cure a test piece first to ensure it sets properly.
Sandwich Dual Forms vs Regular Dual Forms: Key Differences
Understanding these critical differences will prevent the mistakes I made in Part 1. Sandwich dual forms behave completely differently than regular dual forms, and treating them the same way creates structural problems.
Frequently Asked Questions About Sandwich Dual Forms
Can I use gel polish or regular polygel with sandwich dual forms?
Yes, sandwich dual forms work with polygel, builder gel, and similar extension products. However, you cannot use regular gel polish alone as it does not have the structural strength needed for nail extensions. The product must be thick enough to create proper structure whilst being fluid enough to spread to the edges of the form.
Why do I keep getting gaps at the sidewalls even when I press firmly?
Gaps at the sidewalls typically mean the product was not spread to the edges of the form before application, or you flash cured part of the form before pressing it fully. Spread the polygel to the edges using a spatula BEFORE applying to the nail, and do not flash cure any part—press the entire form and cure completely in one step.
How thick should the polygel be inside the sandwich form?
Use less product than you might think—approximately the thickness of the nail extension you want to create. Overfilling causes flooding at the cuticle and prevents proper pressing. Underfilling creates gaps. The correct amount is enough to reach the edges when spread with a spatula, but not so much that it overflows when pressed.
Can I add rhinestones or gems inside sandwich dual forms?
Thick rhinestones or gems should not be placed inside the form as they prevent the polygel from reaching the sidewalls, creating weak structure and gaps. Only use flat decorations like the 3D snowflakes shown in this tutorial. For dimensional decorations, add them on top of the nail after the structure is complete and cured.
How do I know if my natural nails are too hooked for the bottom form?
Look at your nail from the side view. If the natural nail plate curves significantly downward from the base to the free edge (like a hook or ski slope), the bottom form will not sit flush underneath. You will see a visible gap between the form and the nail plate. For these nails, skip the bottom form entirely and use only the top part, then file the underneath to match the natural curve.
Should the product touch the skin at the cuticle when using the bottom form?
This is a technique preference that varies amongst nail technicians. I prefer not to have product touching the skin, so I use a base coat method on the bottom form itself (shown in Part 2). Some technicians do allow minimal product-to-skin contact. Both methods can work when done properly. The key is creating a secure seal without causing client discomfort or potential allergic reactions. Use the method you have been trained in and feel confident with.
How long should sandwich dual form nails last?
When applied correctly with proper structure and no gaps, sandwich dual form nails should last 3-4 weeks, similar to other polygel or builder gel extension methods. Premature lifting or breakage typically indicates application errors—gaps at sidewalls, insufficient product at stress points, or improper curing. If your sandwich dual form nails are lifting within the first week, review the technique corrections in Part 2 of this guide.
Can I mix chrome powder or glitter into polygel for sandwich dual forms?
Yes, but use very small amounts. Adding too much pigment, chrome powder, or gel polish changes the chemistry of the polygel, which can prevent proper curing, weaken the structure, and increase the risk of allergic reactions. Mix only a small amount for the ombre or design sections (as shown in Part 2), and use unmodified polygel for the structural areas—particularly the free edge and stress points. Always test cure a small amount first to ensure it sets properly.
About Your Instructor: Radina Ignatova
Radina Ignatova is a Professional Nail Expert, Certified Educator, and founder of Artistic Touch Nail Training Academy, based in Dundee, Scotland, UK.
With over 15 years of professional experience in advanced nail techniques including Russian Manicure, BIAB, E-File safety, and nail extension methods, Radina specialises in transforming beginner nail technicians into confident professionals through structured online and in-person education.
Her teaching philosophy focuses on honest education—showing real mistakes and real solutions, not just perfect results. This sandwich dual forms tutorial series exemplifies this approach: Part 1 honestly documents every mistake made during first-time testing, whilst Part 2 shows the corrected technique with professional results.
Radina’s teaching emphasises:
- Practical, real-world techniques that work in busy salon environments, not just ideal demonstration conditions
- Troubleshooting and problem-solving rather than memorising steps without understanding why they work
- Student success and confidence building through patient, detailed instruction that addresses common struggles
- Safety and professionalism in every aspect of nail services, including proper product use and client care
Ready to Master Professional Nail Techniques?
Sandwich dual forms are just one of many advanced techniques that require proper understanding to achieve professional results. Learning from someone who shows you both the mistakes and the corrections helps you avoid costly errors and build confidence in your skills.
If this tutorial helped you understand sandwich dual forms better, imagine what comprehensive professional training could do for your entire skill set.
What You Will Achieve in My Courses:
- ✓ Master proper technique from the start—no need to unlearn bad habits later
- ✓ Understand WHY techniques work, not just memorise steps
- ✓ Learn troubleshooting for common problems before they happen
- ✓ Build confidence through comprehensive, honest education
Join over 200 students who have trained with Artistic Touch Nail Training Academy and transformed their nail careers through proper, professional education.
Start Your Professional Nail Training Today
Learn advanced techniques properly with comprehensive courses from Radina Ignatova
Lifetime access • Professional certification • Start immediately
About Artistic Touch Nail Training Academy: Professional online and in-person nail education delivered by Radina Ignatova from Dundee, Scotland, UK. Specialising in Russian Manicure, BIAB, E-File safety, sandwich dual forms, and comprehensive nail education for aspiring and professional nail technicians. Over 15 years of experience, 200+ students trained, honest education showing real mistakes and real solutions.