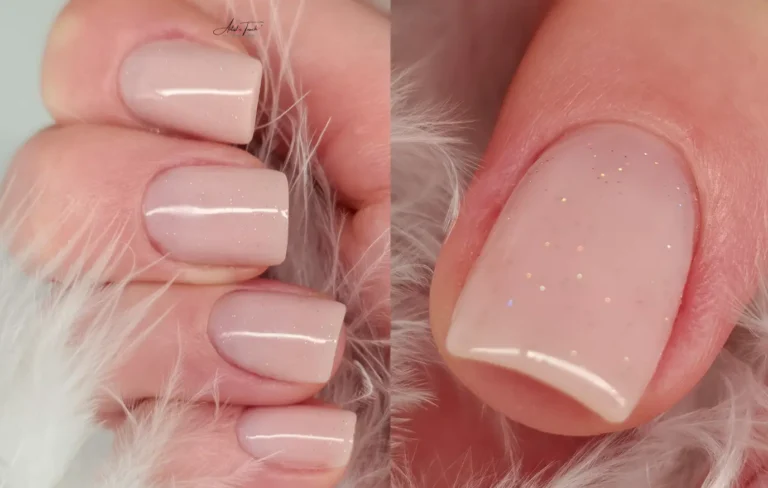
5 BIAB Mistakes That Cost You Client Retention (And How to Fix Them)
Quick Answer: What Are the Most Common BIAB Mistakes?
The five BIAB mistakes that most commonly cause client retention problems are: insufficient nail preparation, incorrect apex placement, improper curing technique, rushed cuticle work, and poor aftercare communication. These mistakes lead to lifting within 7-10 days, chipping at the free edge, and clients who do not return for their next appointment.
Key insight: Most nail technicians focus on application technique but neglect the preparation and structural elements that determine whether BIAB lasts 1 week or 4 weeks. Professional retention requires understanding product chemistry, nail biomechanics, and client education.
Learn more: Master the complete BIAB system through structured training that addresses common problems, troubleshooting techniques, and the professional standards that create consistent 3-4 week retention.
Why BIAB Retention Determines Your Business Success
You have invested in quality BIAB products, watched countless tutorials, and practised your application technique. Your nails look beautiful when clients leave your salon. Then, seven to ten days later, you receive the message you have been dreading: “My nails have started lifting,” or “One nail chipped already,” or worst of all, radio silence as the client books with another nail technician instead of returning to you.
This scenario plays out in nail salons across the UK every single day. BIAB (Builder in a Bottle) has become one of the most requested services because clients love the natural look, the strength it provides, and the promise of 3-4 weeks of perfect nails. However, the gap between what clients expect and what many nail technicians consistently deliver is costing businesses thousands of pounds in lost revenue and damaged reputations.
After training over 200 nail technicians and troubleshooting hundreds of BIAB retention problems, I have identified five critical mistakes that account for approximately 80% of all client retention issues with BIAB services.
The challenging aspect of these mistakes is that they are not obvious. Your application might look perfect in the moment. The client might be thrilled when they leave. But these hidden errors create structural weaknesses, chemical bonding failures, and biomechanical problems that reveal themselves days or weeks later, when it is too late to save the client relationship.
In this comprehensive guide, I will show you exactly what these five mistakes are, why they cause retention problems, and most importantly, how to correct them permanently. This is not about quick fixes or temporary solutions—this is about understanding the underlying principles that separate amateur BIAB application from professional results that keep clients returning month after month.
Understanding Why BIAB Retention Matters More Than You Think
Before we address the specific mistakes, we need to understand the business impact of poor BIAB retention. This is not just about technical skill—it is about your professional reputation, your income stability, and your long-term business growth.
The Real Cost of Poor Retention
When a client experiences lifting, chipping, or premature wear with BIAB, the damage extends far beyond that single appointment. Consider the complete financial impact:
- Lost repeat business: A client who experiences poor retention will not rebook. At £40-60 per BIAB appointment, losing one client costs you £480-720 annually if they would have visited monthly
- Negative word-of-mouth: Dissatisfied clients tell an average of 9-15 people about poor experiences, potentially costing you dozens of future bookings
- Time spent on free repairs: Offering free fixes for lifting or chipping consumes appointment slots you could have filled with paying clients
- Damage to professional reputation: Online reviews mentioning poor retention make it significantly harder to attract new clients
- Reduced pricing power: When your retention is inconsistent, you cannot justify premium pricing, trapping you in a low-margin business model
Conversely, when you consistently deliver 3-4 week retention, something remarkable happens to your business. Clients become evangelists rather than critics. They refer friends and family. They book regular standing appointments. They happily pay premium prices because they trust the quality of your work.
The Retention Revenue Multiplier
Consider two nail technicians: Technician A delivers inconsistent retention (50% of clients experience problems within 2 weeks). Technician B consistently delivers 3-4 week retention. Over one year with 100 initial clients, Technician A retains approximately 20 regular clients whilst Technician B retains 75 regular clients. The revenue difference is £26,400 annually (£33,000 vs £59,400). Mastering retention is literally the difference between struggling and thriving.
What Clients Actually Expect from BIAB
Understanding client expectations helps explain why certain mistakes are so damaging. When clients book BIAB services, they have specific performance expectations based on marketing claims, social media content, and recommendations from friends:
- Minimum 3 weeks without lifting or chipping
- Natural-looking strength and shine throughout the wear period
- No damage to natural nails upon removal
- Comfort during application and throughout wear
- Value that justifies the £40-60 price point
When your BIAB service fails to meet these expectations—even in just one or two categories—clients perceive it as a complete service failure, regardless of how beautiful the nails looked initially.
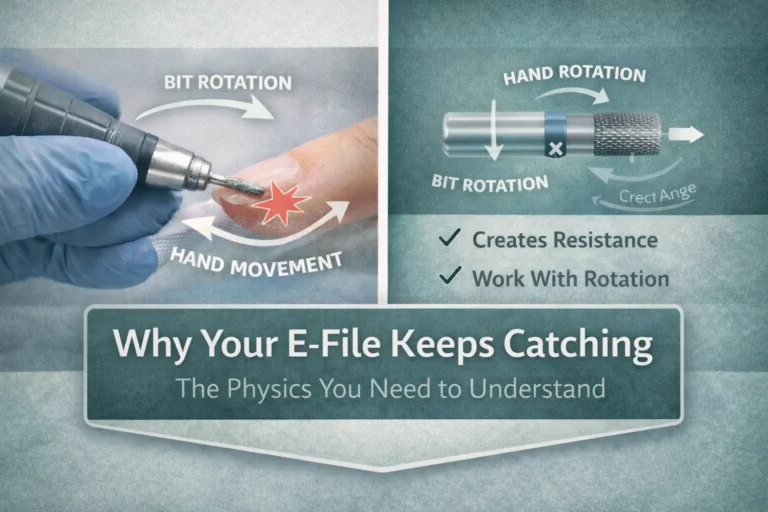
1Mistake #1: Insufficient Nail Preparation (The Hidden Foundation Failure)
This is the most common mistake I observe, and it is also the most damaging to retention. Approximately 60% of all BIAB lifting problems trace back to inadequate nail preparation. The cruel aspect of this mistake is that you cannot see the problem until it is too late—the nails look perfect when you finish, but the chemical bond between product and nail plate is compromised from the start.
Why This Mistake Happens
Nail preparation is time-consuming and, honestly, somewhat boring compared to the creative satisfaction of applying beautiful colour. Many nail technicians rush through preparation because:
- They underestimate its importance relative to application technique
- They face time pressure from back-to-back bookings
- They lack confidence in their cuticle work and skip steps to avoid mistakes
- They do not understand the chemistry of product adhesion
- They assume that BIAB (being a “stronger” system) will compensate for preparation shortcuts
BIAB is a polymer-based gel system. It bonds to the nail plate through chemical adhesion at the molecular level. This bonding can only occur when the nail surface is properly prepared to receive the product. Any contamination, oil, or surface barrier prevents proper adhesion, creating weak spots that eventually lift.
The Specific Preparation Failures That Cause Lifting
Failure 1: Not Removing Enough Natural Oil
Natural nails continuously secrete oil through the nail plate. Some clients produce more oil than others due to genetics, hormones, diet, or topical products they use. When you fail to thoroughly dehydrate and cleanse the nail before BIAB application, this oil creates an invisible barrier that prevents molecular bonding.
What proper dehydration looks like: The nail plate should appear completely matte with no shine whatsoever. If you see any reflective sheen after cleansing, oil remains on the surface. Professional-grade nail dehydrators contain ingredients that both remove existing oil and temporarily prevent additional oil secretion during application.
Failure 2: Inadequate Cuticle Removal
The cuticle area is the most common site of BIAB lifting. This occurs because dead cuticle tissue (pterygium) clings to the nail plate even after pushing back the living cuticle. When BIAB is applied over this dead tissue, it bonds to the tissue rather than the nail. As the tissue naturally detaches from the nail plate over the following days, the BIAB lifts with it.
What proper cuticle removal requires: Use an e-file with appropriate bit or manual nippers to remove all visible dead tissue from the nail plate surface, not just around the cuticle line. The nail should feel completely smooth when you run your finger from sidewall to sidewall at the cuticle area—any catch or rough texture indicates remaining tissue that will cause lifting.
Failure 3: Not Removing Surface Shine Adequately
The natural nail has a shiny surface layer created by keratin plates lying flat. BIAB cannot penetrate this smooth surface to create mechanical adhesion. Light buffing creates microscopic texture that provides mechanical grip to supplement the chemical bond.
What proper buffing achieves: The entire nail surface should have a uniform matte appearance with no shiny spots remaining. Use a 180-grit buffer or fine e-file bit. The goal is not to thin the nail but to create consistent surface texture. Pay particular attention to the cuticle area and sidewalls, which are often neglected.
⚠️ Critical: Over-Buffing Causes Different Problems
Whilst insufficient buffing causes lifting, excessive buffing creates nail damage and sensitivity. Never use coarse files (below 150 grit) on natural nails. Never apply heavy pressure during buffing. The goal is surface texture change, not thickness reduction. If the nail feels warm during buffing or if the client reports sensitivity, you have buffed too aggressively. Damaged nails absorb moisture differently and may cause BIAB to lift due to osmotic pressure changes beneath the product.
The Professional Preparation Protocol
This is the step-by-step preparation sequence that consistently delivers strong adhesion and prevents lifting at the cuticle area:
- Cleanse with isopropyl alcohol (70% or higher): Remove all topical oils, lotions, and contaminants
- Push back cuticle with orangewood stick or metal pusher: Expose all dead tissue attached to nail plate
- Remove dead cuticle tissue with e-file or nippers: Eliminate all pterygium from nail surface, not just cuticle line
- Lightly buff entire nail surface with 180-grit buffer: Create uniform matte texture without thinning nail
- Remove all dust with soft brush: Any remaining dust particles create lifting sites
- Apply professional nail dehydrator: Use product specifically formulated for nail dehydration, not regular alcohol
- Allow 30-60 seconds for complete evaporation: Do not rush this step
- Apply acid-free primer if needed: For clients with history of lifting or naturally oily nails
- Begin BIAB application immediately: Natural oil secretion begins within minutes of dehydration
This preparation protocol takes 5-8 minutes per client when executed properly. That time investment is the difference between nails that last 1 week and nails that last 4 weeks.
“I always wondered why some clients’ nails would last 3 weeks whilst others lifted within days. After learning the proper preparation protocol, my retention problems disappeared almost completely. The preparation is boring but absolutely essential—I was rushing through it to save time and it was costing me clients.”
2Mistake #2: Incorrect Apex Placement (The Structural Weakness)
Even with perfect preparation and adhesion, BIAB nails will chip, crack, or break if the apex is incorrectly placed. This is a biomechanical problem rather than a chemical adhesion problem, but it causes the same outcome—clients who do not return because their nails could not withstand normal daily activities.
Understanding Apex and Why It Matters
The apex is the highest point of product thickness on the nail. In proper nail architecture, the apex should be positioned approximately one-third of the distance from cuticle to free edge (closer to the cuticle than the centre). This placement distributes stress forces across the nail structure in a way that prevents breaking and cracking.
Think of the apex like the keystone in an arch bridge. When properly positioned, it transfers and distributes weight efficiently. When misplaced, stress concentrates at weak points, causing structural failure.
The Three Most Common Apex Mistakes
Apex Mistake 1: Placing the Apex at the Centre of the Nail
Many nail technicians intuitively place the apex at the nail centre, thinking this creates balanced structure. In reality, centre-positioned apex creates a seesaw effect. When the nail experiences impact at the free edge (which happens constantly during typing, opening containers, or normal hand use), the stress force focuses at the apex location. If the apex is at the centre, this stress cannot dissipate and instead creates a crack that propagates through the product.
Why proper position matters: When the apex is closer to the cuticle (approximately one-third from base to tip), impact forces at the free edge distribute across a larger surface area. The longer distance from free edge to apex allows stress to spread out before reaching the thickest part of the product, preventing crack formation.
Apex Mistake 2: Creating a Flat Profile with No Apex
Some nail technicians apply BIAB in thin, even layers across the entire nail, creating a flat profile with no distinguishable apex point. This typically happens when using BIAB like regular gel polish rather than as a builder system.
Why this fails: Without an apex, the nail has no structural reinforcement. The product is equally thin everywhere, making it equally weak everywhere. The nail will flex excessively during daily activities, and this flexing causes the product to separate from the natural nail at the stress points (typically sidewalls and free edge).
Apex Mistake 3: Making the Apex Too Pronounced or Too Thick
Overcompensating for thin application by creating an extremely thick apex creates different problems. Whilst structural strength increases, the weight and bulk become problematic.
Why this causes issues: Excessive thickness adds weight to the nail, which increases the stress forces the structure must handle. The unnatural feel causes clients to pick at the product or use their nails as tools (because the thickness makes the nails feel invincible). Both behaviours lead to damage and lifting. Additionally, overly thick product requires extended curing time and may not cure completely at the deepest layers, causing later problems with texture and durability.
How to Create the Perfect Apex
Proper apex creation requires a three-layer building technique combined with understanding of nail length and shape:
Layer 1: Base Coverage Layer
- Apply thin, even coat covering entire nail plate
- This layer creates adhesion and seals the nail
- Do not attempt to build structure in this layer
- Flash cure for 15-30 seconds (or cure fully if working with one nail at a time)
Layer 2: Apex Building Layer
- Apply bead of BIAB approximately one-third from cuticle to free edge
- Allow product to self-level slightly towards cuticle and free edge
- The highest point should remain at one-third position
- Product thickness at apex should be 1.5-2mm for natural nail length, up to 2.5mm for extended length
- Ensure smooth graduation from apex to cuticle and apex to free edge (no bulges or ridges)
- Cure fully according to product manufacturer instructions
Layer 3: Refinement and Smoothing Layer
- Apply thin layer that perfects the shape and smooths any imperfections
- This layer should not significantly change apex position or height
- Focus on creating smooth transitions and perfect sidewall lines
- Cure fully
Visual Check: The Profile Test
Before curing your second layer, view the nail from the side profile. You should see a gentle curve rising from the cuticle to the apex position (one-third point), then gradually descending towards the free edge. If you see a flat line, your apex is too low. If you see a mountain peak, your apex is too high. If the highest point is at the centre or towards the free edge, your apex is misplaced. Correct these issues before curing by adding or manipulating product whilst it is still workable.
Apex Adjustment for Different Nail Shapes and Lengths
Not all nails require identical apex placement. Client nail characteristics determine optimal apex position:
Short Natural Nail Length: Apex at one-third position, 1.5mm maximum thickness. Focus on smooth, natural profile.
Medium Extensions: Apex may shift slightly forward (closer to 40% from cuticle rather than 33%) to account for increased length. Thickness up to 2mm at apex.
Downward-Growing Nails (Ski Slope): Apex must be more pronounced and positioned at 25-30% from cuticle to counteract natural downward curve. May require 2-2.5mm thickness to create proper structure.
Flexible or Bendy Nails: Apex should be perfectly positioned at one-third point with full 2mm thickness to provide maximum structural support against natural nail movement.
✓ Master Professional BIAB Application and Troubleshooting
Learn the complete BIAB system that eliminates lifting, creates 3-4 week retention, and builds your reputation as a nail technician clients trust.
- ✓ Complete preparation protocols for every nail type
- ✓ Apex placement and structural building techniques
- ✓ Troubleshooting guide for common BIAB problems
- ✓ Advanced techniques for difficult nails (oily, flexible, downward-growing)
- ✓ Client consultation and aftercare communication
- ✓ Professional removal and infill procedures
3Mistake #3: Improper Curing Technique (The Invisible Chemistry Problem)
You cannot see whether BIAB has cured properly just by looking at it. Poorly cured product appears identical to properly cured product initially, but the chemical transformation has not completed. This incomplete cure causes multiple problems that manifest days or weeks later: surface dulling, unexpected chipping, texture changes, and even allergic reactions from uncured photoinitiators remaining in contact with skin.
Understanding the Curing Process
BIAB is a photopolymer gel. When exposed to UV or LED light of appropriate wavelength, photoinitiators in the gel trigger a chemical reaction called polymerisation. During polymerisation, small molecules (monomers) link together to form long chains (polymers), transforming the liquid gel into solid plastic.
This process requires three conditions to complete successfully:
- Correct wavelength of light: BIAB products are formulated for specific light wavelengths (typically 395-405nm for LED)
- Adequate light intensity: Measured in watts; insufficient wattage means inadequate energy for complete polymerisation
- Sufficient exposure time: The polymerisation reaction takes time to complete; rushing this process leaves partially cured product
When any of these conditions is not met, you get incomplete cure, which causes the retention problems clients experience 1-2 weeks later.
The Three Most Common Curing Mistakes
Curing Mistake 1: Using an Inadequate or Mismatched Lamp
Not all lamps cure all products equally well. A 36-watt UV lamp might cure one brand perfectly whilst under-curing another brand. LED lamps vary in the specific wavelengths they emit, and some BIAB formulations require narrower wavelength ranges than others.
What this causes: Inadequate curing leaves the product softer and more flexible than it should be. Initially, the nails might even feel fine. However, the incompletely polymerised gel continues to undergo slow chemical changes over the following days, causing the product to shrink slightly, develop microcracks, or separate from the nail plate at weak adhesion points.
The solution: Use a professional-grade LED lamp with minimum 48 watts power and broad wavelength coverage (385-405nm). Verify that your lamp is compatible with your chosen BIAB brand by checking manufacturer specifications. Replace lamp bulbs according to manufacturer recommendations (typically every 6-12 months of regular use) because LED output diminishes over time even though the lights still appear bright.
Curing Mistake 2: Rushing the Cure Time
Every BIAB product has a specified cure time—typically 60-90 seconds for LED lamps. Some nail technicians reduce this time to 30-45 seconds to speed up the service, believing that if the product feels hard, it must be cured.
What this causes: The surface layer cures quickly because it receives direct light exposure, creating the hard-to-touch feel. However, deeper layers (particularly at the apex where product is thickest) receive less light energy and require the full cure time to complete polymerisation. When you under-cure the deep layers, they remain partially liquid. This uncured material cannot bond properly to the cured surface layer above it, creating internal weakness that causes delamination (the layers separate) after days of wear.
The solution: Always cure for the full recommended time. If anything, extend cure time by 10-15 seconds for thicker applications or when working on clients with deep nail beds that shade the nail plate. Never reduce cure time below manufacturer recommendations. The 30-60 seconds you save per nail is not worth the retention problems and client dissatisfaction it causes.
Curing Mistake 3: Not Accounting for Lamp Positioning and Hand Placement
Light intensity decreases with distance and with angle. Nails positioned at the back of the lamp or at extreme angles receive less light energy than nails positioned centrally and parallel to the light source.
What this causes: Uneven curing across different nails. Typically, the thumb and pinky finger receive less light exposure than the middle three fingers due to hand anatomy and lamp design. These inadequately cured nails show problems within 7-10 days whilst the other nails remain perfect, creating confusing inconsistency in your results.
The solution: Position the hand so that all five nails are as close to the light source as possible and as perpendicular to the light as anatomy allows. Some nail technicians cure thumbs separately to ensure adequate exposure. For clients with very large or very small hands that do not fit standard lamp dimensions, consider curing three fingers, then repositioning to cure thumb and pinky with optimal exposure.
⚠️ Safety Note: Over-Curing Is Not Possible with LED
You cannot damage BIAB by curing it too long with LED lamps. Once polymerisation completes, additional light exposure has no effect on the cured product. If you are uncertain whether cure time was adequate, cure for an additional 60 seconds. The only consideration is heat—some clients experience warmth during curing due to the exothermic polymerisation reaction. This heat sensation is temporary and does not indicate damage, though it can be uncomfortable. If a client reports excessive heat, remove their hand from the lamp for 10-15 seconds, then resume curing.
How to Verify Proper Cure
Whilst you cannot see incomplete cure, you can test for it using these methods:
Surface Tackiness Test: Properly cured BIAB should have either no tackiness or a very thin tacky layer (inhibition layer). If the surface feels sticky or soft to firm touch, curing is incomplete.
Smell Test: Fully cured product has minimal odour. Strong chemical smell indicates significant amounts of uncured monomer remaining in the product.
Pressure Test: Press firmly on the cured apex with your fingernail. Properly cured BIAB should feel completely solid with no give or flex in the product itself (the natural nail beneath may flex, but the BIAB should not). Any softness or depression indicates incomplete cure.
Consistency Test: All ten nails should feel identical when tapped with a tool or fingernail. Different hardness levels indicate uneven curing, usually from lamp positioning issues.
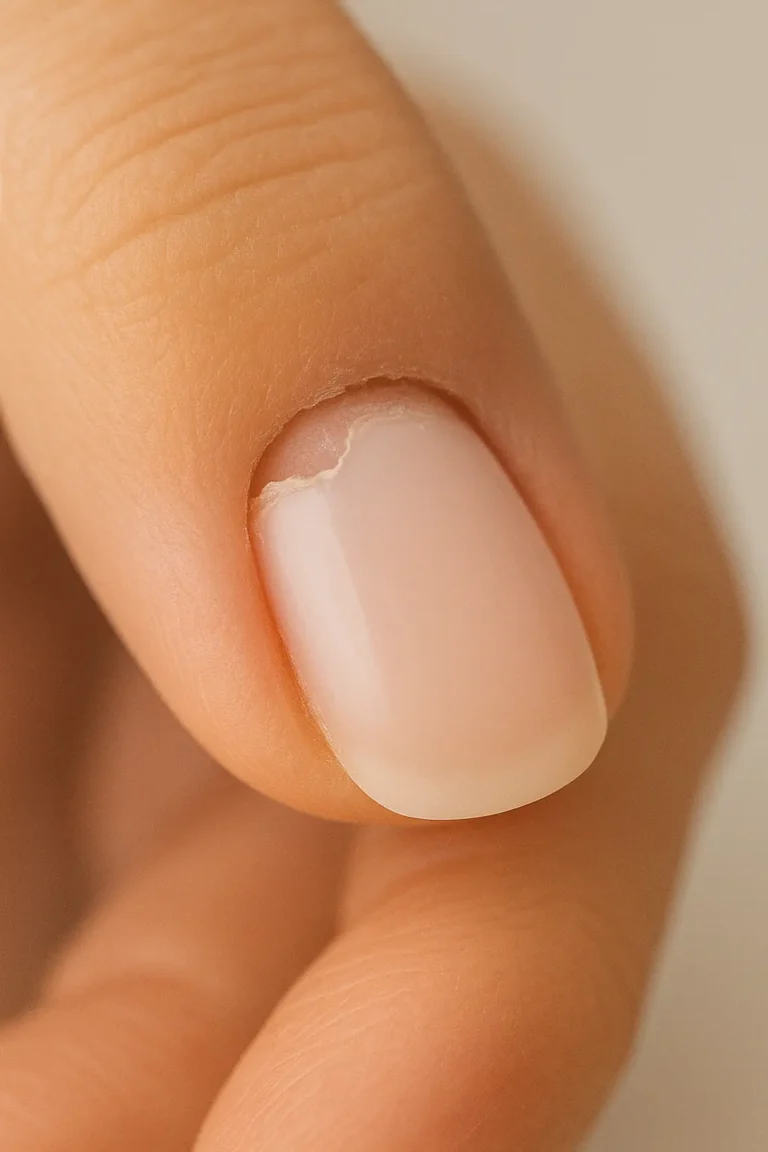
4Mistake #4: Rushed Cuticle Work (The Professionalism Gap)
This mistake affects both retention (through lifting at the cuticle area) and client satisfaction (through appearance of the finished nails). Cuticle work is the visible signature of your professionalism. Clients might not understand apex placement or curing chemistry, but they absolutely notice messy cuticle lines, product on skin, or visible gaps between product and cuticle.
Why Cuticle Work Is So Challenging
The cuticle area presents multiple simultaneous challenges:
- The natural nail curves downward at the cuticle, making it difficult to achieve smooth product flow
- The living cuticle (eponychium) must be avoided whilst dead cuticle (pterygium) must be removed
- Product naturally wants to flood towards the cuticle due to gravity and surface tension
- The area is highly visible and draws immediate attention when viewed from normal angles
- Any gap between product and cuticle becomes a collection site for debris and looks unprofessional within days
When nail technicians feel time pressure or lack confidence in their cuticle technique, they rush this critical area, leading to the problems that cost them client retention.
The Specific Cuticle Mistakes That Lose Clients
Cuticle Mistake 1: Leaving a Gap Between Product and Cuticle
Fear of flooding causes many nail technicians to stop product application 1-2mm away from the cuticle line. This creates a visible gap that immediately signals amateur work to clients.
Why this causes retention problems: Even if the product itself lasts well, clients perceive the service as poor quality because the gap grows more visible as nails grow, collecting dirt and making the nails look unkempt within 7-10 days. Clients do not return because the cosmetic appearance fails their expectations, even though the technical retention might be acceptable.
Cuticle Mistake 2: Flooding Product Onto Skin
The opposite problem—applying product too close and allowing it to flood onto the cuticle or side skin. This happens when using overly liquid consistency BIAB or applying too much product at once.
Why this causes retention problems: Product on skin does not adhere properly. It remains slightly tacky even after curing, collects debris, and typically peels away within days, taking some of the properly applied product with it and creating lifting at the cuticle line. Additionally, clients find it uncomfortable and unprofessional to have product adhered to their skin.
Cuticle Mistake 3: Not Removing All Dead Cuticle Before Application
We discussed this as part of preparation (Mistake #1), but it deserves emphasis here because it is so commonly neglected. Dead cuticle tissue on the nail plate at the cuticle area guarantees lifting within 7-10 days.
Why this happens repeatedly: Proper cuticle removal requires either confident e-file work or meticulous manual work with cuticle nippers. Both techniques require practice and add time to the service. Nail technicians who lack confidence in cuticle work often skip this step, hoping the BIAB will somehow seal over the dead tissue. It never works.
The Professional Cuticle Application Technique
Perfect cuticle work requires a specific approach that balances coverage with control:
Step 1: Proper Cuticle Preparation (Before Any Product)
- Push cuticle back using gentle pressure with orangewood stick or metal pusher
- Remove all visible dead cuticle tissue from nail plate surface using e-file safety bit or cuticle nippers
- Clean under and around cuticle with lint-free wipe and cleaner
- Verify that nail surface at cuticle area is completely smooth and clean
Step 2: Strategic Product Application at Cuticle
- Place small bead of BIAB approximately 2mm away from cuticle line
- Using brush, gently push product towards cuticle whilst simultaneously pulling back slightly
- This technique uses surface tension to create a fine line right at the cuticle edge without flooding
- The goal is to finish approximately 0.5mm from the living cuticle—close enough that no gap is visible, far enough that no flooding occurs
- If product does flood, immediately clean it away with orangewood stick or brush before curing
Step 3: Flash Cure and Refinement
- Flash cure for 15-30 seconds to set the product in place
- Check all ten cuticle lines for consistency before proceeding to apex building
- If any gaps or floods are visible, correct them now whilst you can still manipulate the product
- This flash cure technique prevents product from flowing during apex building
Practice Technique: The Paper Exercise
To develop confidence with cuticle line control, practise on paper before working on nails. Draw ten nail shapes on paper with a curved line representing the cuticle. Using your BIAB and brush, practise creating perfect lines right at the drawn cuticle edge without crossing over. This practice develops the brush control and product manipulation skills you need for clean cuticle work. Practise until you can create ten consecutive perfect lines without any flooding or gaps.
5Mistake #5: Poor Aftercare Communication (The Prevention Failure)
Even perfectly applied BIAB can fail prematurely if clients do not understand how to care for their nails during the wear period. This mistake is different from the previous four because it occurs after the client leaves your salon, but it is equally important for retention and equally under your control through proper communication.
Why Aftercare Communication Matters
Clients come to you as nail experts, but they are not nail experts themselves. They do not understand what causes lifting, what activities risk damage, or how to identify early warning signs of problems. Without proper education, they will unintentionally compromise the durability of even the best BIAB application.
Consider what happens in the 3-4 weeks between appointments:
- Clients wash dishes without gloves, exposing nails to hot water and harsh detergents
- Clients use nails as tools (opening cans, peeling labels, scratching lottery tickets)
- Clients apply cuticle oils or hand creams that seep under the product at the cuticle line
- Clients file or pick at their nails when they notice small imperfections
- Clients wear gloves that trap moisture against the nails for extended periods
- Clients expose nails to chemicals (hair dye, cleaning products, acetone-based products) that compromise BIAB integrity
Every one of these behaviours increases the risk of premature lifting, chipping, or damage. Your job is not just to apply excellent BIAB—it is to educate clients about protecting your work and their investment.
The Specific Aftercare Failures That Cause Problems
Aftercare Failure 1: Not Explaining What Causes Lifting
Most clients do not understand that lifting is usually caused by moisture infiltration at weak points rather than poor application. When they see lifting start, they blame your work rather than recognizing their own behaviours that contributed to the problem.
What to communicate: “BIAB creates a seal on your natural nail. This seal can be compromised by extended exposure to water, especially hot water, which causes the product to soften slightly and allows moisture to seep underneath. This trapped moisture causes lifting. The best way to prevent this is to wear gloves for dishwashing, prolonged cleaning, or any activity involving extended water exposure.”
Aftercare Failure 2: Not Addressing the “Nails as Tools” Problem
Clients with newly strengthened nails often start using them as tools because the nails feel strong enough to withstand it. This behaviour causes stress forces that exceed the design limits of BIAB, leading to chipping at the free edge or cracks at the apex.
What to communicate: “Your nails are stronger now, but they are not indestructible. Using nails to open things, peel stickers, or pry objects creates stress forces that can cause cracking or chipping. These behaviours account for most premature damage to BIAB nails. If you need to open something, use the proper tool instead of your nails.”
Aftercare Failure 3: Not Providing Clear Guidance on Oil Use
Cuticle oil is beneficial for natural nail health, but improper application can cause BIAB lifting. Many clients apply oil liberally across the entire nail, and this oil seeps under the product at the cuticle line, weakening adhesion.
What to communicate: “Cuticle oil is excellent for nail health, but apply it carefully. Place a small amount directly on the cuticle area and side walls, then massage it in. Avoid getting oil on the BIAB surface or allowing it to pool at the cuticle line. If oil does get on the nail surface, wipe it away rather than rubbing it in. Oil on the product surface makes it slippery and can seep underneath through micro-gaps.”
The Professional Aftercare Communication System
Rather than hoping clients will remember verbal instructions given whilst they are checking their beautiful nails, implement a systematic aftercare communication approach:
During the Appointment (Verbal Communication):
- Explain the three main causes of premature failure: extended water exposure, using nails as tools, and improper oil application
- Demonstrate proper cuticle oil application technique
- Discuss their specific lifestyle (e.g., if they mention they cook frequently, emphasize glove use for dishwashing)
- Ask if they have specific concerns or questions about care
After the Appointment (Written Communication):
- Provide printed aftercare instructions or email them a detailed care guide
- Written instructions ensure clients have a reference at home when questions arise
- Include your contact information so they can reach out with concerns before problems become severe
Follow-Up Communication:
- Send a message 7-10 days after appointment asking how the nails are holding up
- This early check-in identifies problems whilst they can still be addressed
- It demonstrates professional care and increases the likelihood that clients will contact you if issues develop rather than simply not rebooking
✓ Do This
- Wear gloves for washing dishes
- Apply cuticle oil to cuticle area only
- Use proper tools instead of nails
- Moisturize hands regularly
- Contact salon if lifting begins
- Return for scheduled infills
✗ Avoid This
- Extended hot water exposure
- Using nails to open/pry things
- Picking or peeling at nails
- Acetone-based polish remover
- Harsh chemical exposure
- Ignoring small lifting areas
BIAB Retention Problems: Cause and Solution Reference
| Problem | Most Likely Cause | Prevention Strategy | Client Communication |
|---|---|---|---|
| Lifting at Cuticle Area | Inadequate preparation or dead cuticle tissue | Thorough cuticle removal and dehydration | “Avoid excessive cuticle oil pooling” |
| Lifting at Free Edge | Insufficient product sealing at tip or water exposure | Cap free edge and educate about water exposure | “Wear gloves for extended water contact” |
| Chipping at Free Edge | No apex or using nails as tools | Proper apex placement at one-third position | “Use proper tools, not your nails” |
| Cracking at Apex | Apex misplaced at centre or excessive impact | Position apex at one-third from cuticle | “Avoid impact activities without protection” |
| Product Peeling in Sheets | Incomplete curing or preparation failure | Full cure time and verify lamp compatibility | “Contact salon immediately if this occurs” |
| Dull Surface After 1-2 Weeks | Incomplete cure or harsh chemical exposure | Adequate cure time and aftercare education | “Avoid acetone and harsh cleaning products” |
| Product Softening | Under-curing or excessive heat exposure | Verify lamp wattage and cure time | “Keep hands out of hot water when possible” |
| Visible Gap at Cuticle Within Days | Poor cuticle line application | Flash cure technique for cuticle lines | “Book infills at 3-4 weeks for best appearance” |
Frequently Asked Questions About BIAB Retention Problems
How long should BIAB actually last without any lifting or chipping?
With proper application and client aftercare, BIAB should last 3-4 weeks without any lifting, chipping, or structural problems. Some clients achieve even longer wear (5-6 weeks), particularly if their nails grow slowly and they are very careful with nail protection. However, 3-4 weeks is the professional standard you should consistently achieve. If your clients regularly experience problems within 2 weeks, one or more of the five mistakes discussed in this article is occurring.
Is it normal for one or two nails to lift whilst the others are perfect?
This pattern typically indicates inconsistent preparation or technique variation across different fingers. Most commonly, it suggests inadequate cuticle removal or dehydration on the affected nails, or uneven curing due to lamp positioning issues. Some clients also have naturally more flexible or oily nails on specific fingers (often thumb or ring finger), which require extra attention during preparation. If you consistently have problems with the same finger positions across multiple clients, evaluate your lamp positioning and verify that those fingers receive adequate light exposure during curing.
Why do some clients’ nails lift within days whilst others last perfectly for weeks?
Individual nail characteristics significantly affect BIAB retention. Clients with naturally oily nails, flexible nail plates, or high nail bed moisture require more thorough preparation and may benefit from acid-free primer. Additionally, client lifestyle dramatically impacts retention—those who frequently expose nails to water, use nails as tools, or work with chemicals will experience more problems regardless of application quality. This is why aftercare education is so critical. When you have inconsistent results across different clients with apparently identical technique, investigate both nail characteristics (ask about nail history and any recurring problems) and lifestyle factors (occupation, hobbies, hand washing frequency).
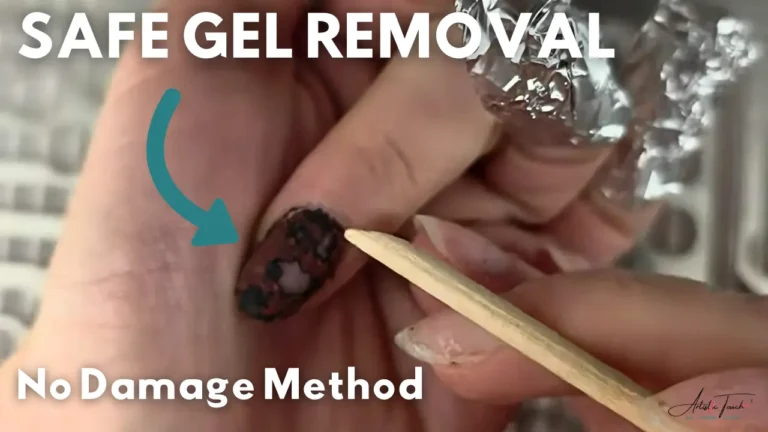
Can I fix lifting once it starts, or should I remove and reapply?
Small lifting (under 2mm from cuticle or free edge) can sometimes be addressed by filing back the lifted area, re-preparing the exposed nail, and reapplying product. However, if lifting has progressed more than 2mm, or if moisture has infiltrated under the product, complete removal and reapplication is the professional solution. Attempting to patch over compromised product rarely works because the underlying adhesion failure continues to spread. More importantly, clients notice patched repairs and perceive them as lower quality work. From a business perspective, offering a fresh reapplication (even if you do not charge for it) creates better client satisfaction than a visible patch repair.
Should I use acid-free primer with BIAB to improve retention?
Acid-free primer is beneficial for clients with consistently oily nails or history of lifting problems, but it is not necessary for all clients. Primer works by dehydrating the nail surface and creating slightly rougher texture for improved mechanical adhesion. For clients with normal nail characteristics and proper preparation, primer provides minimal additional benefit and adds cost and time to your service. Reserve primer for problem cases: clients who have experienced lifting previously, those with visibly oily nails even after dehydration, clients who work with their hands in water frequently, and those with naturally flexible nail plates. Never use acid primer (the older pH-bonding primer) with BIAB, as it can over-etch the nail plate and actually worsen adhesion whilst causing nail damage.
How do I know if my lamp is adequate for curing BIAB properly?
Your lamp should be minimum 48 watts with LED technology for reliable BIAB curing. Verify that the lamp wavelength range (typically specified as 365-405nm or similar) matches your BIAB product specifications. To test lamp adequacy, cure a thick application of BIAB for the recommended time, then test hardness by pressing firmly on the cured product with your fingernail. If you can create any indentation or if the product feels flexible rather than rigid, your lamp is inadequate or the bulbs need replacement. Professional-grade lamps typically need bulb replacement every 6-12 months of regular use even though they appear to be working—LED output diminishes over time without visible indication. If you are experiencing retention problems despite correct technique, lamp inadequacy is a common underlying cause.
What should I tell clients who want to extend BIAB beyond 4 weeks?
Whilst BIAB can sometimes last longer than 4 weeks technically, extended wear creates problems that justify scheduled maintenance. As natural nails grow, the apex position shifts forward (away from the cuticle), weakening the structural support and increasing chip and crack risk. Additionally, the visible gap at the cuticle becomes increasingly prominent, making the nails look unkempt. From a business perspective, longer wear cycles reduce your annual revenue per client. Educate clients that 3-4 week maintenance creates the best appearance, maintains optimal nail health, and ensures structural integrity. Position this as professional care rather than unnecessary expense—proper maintenance prevents the bigger problems and costs associated with complete BIAB failure and removal.
Why does BIAB sometimes peel off in whole sheets instead of lifting at edges?
Sheet peeling indicates complete adhesion failure, almost always caused by preparation inadequacy or severe under-curing. When BIAB peels as a sheet, it means the product never properly bonded to the nail plate at a molecular level. The most common cause is oil or moisture contamination during preparation that was not properly removed. The second most common cause is incomplete curing that left the bottom layer of product partially liquid, preventing proper adhesion. Less commonly, sheet peeling occurs when clients are exposed to specific chemicals (some hair dyes, certain cleaning products, or acetone) that break down the polymer structure. If sheet peeling occurs regularly in your work, conduct thorough preparation audit and verify your lamp curing adequacy. If it occurs occasionally with specific clients, investigate their chemical exposures and consider whether they require primer for their nail type.
About Your Instructor: Radina Ignatova
Radina Ignatova is a Professional Nail Expert, Certified Educator, and founder of Artistic Touch – Nail Training Academy, based in Dundee, Scotland, UK.
With over a decade of professional experience in advanced nail techniques including BIAB systems, e-file manicure, Russian Manicure, and professional nail preparation, Radina specialises in transforming beginner nail technicians into confident professionals through structured online and in-person education.
Her teaching philosophy focuses on:
- Problem-solving rather than just technique demonstration to develop adaptable skills for real client situations
- Honest education that shows real mistakes and solutions rather than presenting only perfect results
- Understanding the science behind techniques so students know not just what to do, but why it works
- Business success through technical excellence that builds client retention and referrals
Radina has trained over 200 certified nail technicians and has been featured multiple times in Scratch Magazine for her educational contributions to the UK nail industry.
Stop Losing Clients to Retention Problems
Understanding what causes BIAB retention problems is the first step. The next step is developing the systematic approach, troubleshooting skills, and professional standards that allow you to consistently deliver 3-4 week retention on every client, regardless of their nail type or lifestyle.
The five mistakes I have outlined in this article are not isolated problems—they are interconnected elements of a complete BIAB system. Professional retention requires mastering all five areas: preparation, structural building, curing chemistry, application technique, and client education.
What You Will Master:
- ✓ Complete preparation protocols for all nail types and conditions
- ✓ Apex placement and structural building techniques that prevent chipping
- ✓ Professional cuticle work that creates clean lines without flooding
- ✓ Troubleshooting system for identifying and correcting retention problems
The BIAB Masterclass teaches the complete system I have developed through training over 200 nail technicians, addressing every aspect of professional BIAB work from nail assessment through advanced troubleshooting for challenging cases.
Transform Your BIAB Retention Results
Learn the professional system that creates consistent 3-4 week retention and builds your reputation as a nail technician clients trust and recommend
Enrol in BIAB Masterclass Now →
Lifetime access • Professional certification • Start immediately • Complete troubleshooting system
About Artistic Touch – Nail Training Academy: Professional online nail education delivered by Radina Ignatova from Dundee, Scotland, UK. Specialising in BIAB systems, e-file manicure techniques, Russian Manicure, and comprehensive nail education for aspiring and professional nail technicians.